
If you’ve ever thought about setting a cozy and intimate mood while getting a soothing massage, then look no further! Allow me to present you with the ideal solution: a massage oil candle.
This unique creation combines the gentle glow of a candle with the nourishing benefits of massage oil, creating a truly luxurious experience.
In this article, I will guide you through the step-by-step process of making your very own massage oil candle. From gathering your supplies to giving a relaxing massage, you’ll have all the knowledge you need to create a truly special ambiance.
Before we dive into the details, let me assure you that making a massage oil candle is easier than you might think. With just a few simple ingredients and a little bit of patience, you’ll be well on your way to creating a homemade masterpiece.
So, let’s get started and unleash your inner candle-making maestro!
Key Takeaways
- Massage oil candles combine the benefits of a candle and massage oil to create a luxurious and intimate ambiance.
- Making a massage oil candle is easier than you might think, requiring key supplies such as a heat-resistant container, wax, wick, and essential oils.
- The double boiler method should be used to melt the wax slowly and evenly, and the melted wax should be stirred with essential oils for an even distribution of fragrance.
- Proper wick placement, trimming, and maintenance are essential for a safe and enjoyable burn, and candle safety precautions should be followed to ensure a worry-free experience.
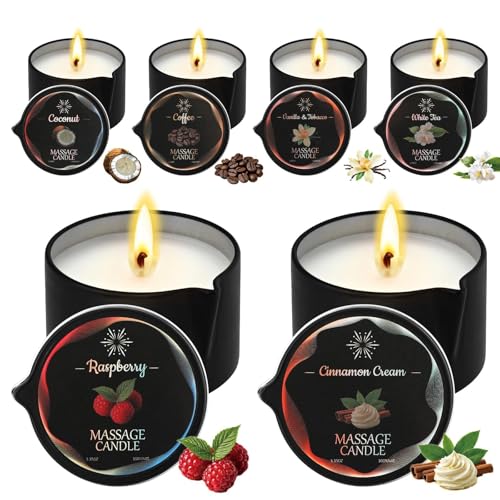
Sariiraw 6 Pack 2.35oz Low Temp Soy Massage Oil Candle Spa Set
- Set Includes: Six 2.35oz massage candles with scents
- Natural Soy Wax: Made of natural soy wax for gentle melting
- Aromatherapy Scents: Includes Coconut, Coffee, White Tea, Vanilla & Tobacco, Raspberry, Cinnamon Cream
As an affiliate, we earn on qualifying purchases.
As an affiliate, we earn on qualifying purchases.
Gather Your Supplies
Get ready to indulge in a luxurious experience by gathering all the supplies you’ll need to create your own massage oil candle! To start, you’ll need a few key items that can easily be found at your local craft store or online.
First, choose a work surface that’s flat and heat-resistant, such as a glass or metal container. This’ll ensure a safe and stable area to work on.
Next, you’ll need to select the essential oil options for your massage oil candle. There are many different scents to choose from, including lavender, eucalyptus, and vanilla. Consider the mood you want to create and select an oil that matches that ambiance. Additionally, you may want to experiment with blending different oils to create a unique scent that suits your preferences.
Once you have gathered all the necessary supplies, it’s time to prepare your work area. Clear a clean and clutter-free space where you can comfortably assemble your massage oil candle. Make sure to have all your supplies within reach, including the wax, wick, essential oils, and any additional decorative elements you may want to incorporate into your candle.
With your supplies ready and your work area set up, let’s move on to the next step of creating your very own massage oil candle.
Prepare Your Work Area
Clear a space on your work area as wide as the Grand Canyon so you have plenty of room to prepare for the magic to come. Creating a massage oil candle requires a well-organized and safe work area set up. Before you begin, make sure you have all the necessary supplies within easy reach.
Lay out a clean, heat-resistant surface, such as a metal tray or a baking sheet, to protect your work area from any spills or accidents. Additionally, place a thick layer of newspaper or an old towel underneath the tray to catch any drips or splatters.
Safety precautions are essential when working with hot wax. Keep a fire extinguisher nearby, just in case. Ensure your work area is well-ventilated to prevent the buildup of fumes. If possible, work in a room with open windows or use a fan to circulate the air. It’s also recommended to wear heat-resistant gloves to protect your hands from potential burns. Lastly, never leave the melting wax unattended, as it can quickly become a fire hazard.
With your work area prepared and safety precautions in place, you’re now ready to move on to the next step: melting the wax.
Melt the Wax
To melt the wax for the massage oil candle, I prefer using the double boiler method as it provides a gentle and controlled heat. This method involves placing a smaller pot with the wax inside a larger pot filled with water.
As the water heats up, it melts the wax slowly and evenly. Once the wax is melted, I add my chosen essential oils to create a soothing and aromatic blend for the massage candle. It’s important to choose essential oils that are safe for skin contact and have relaxing properties, such as lavender or chamomile.
Use a Double Boiler Method
When using the double boiler method, it’s important to keep the heat low and steady to prevent the wax from overheating. This method ensures the wax melts evenly and reduces the risk of accidents or fires.
Here are some key points to consider when using the double boiler method for melting wax:
- Fill the bottom pot of the double boiler with water, making sure it doesn’t touch the top pot.
- Place the wax in the top pot and set it over the simmering water.
- Stir occasionally to ensure even melting.
- Monitor the temperature using a candy thermometer to keep it around 160-180 degrees Fahrenheit.
By following these double boiler safety guidelines, you can melt the wax safely and effectively.
Once the wax is completely melted, it’s time to move on to the next step and add your chosen essential oils to create a delightful fragrance for your massage oil candle.
Add Your Chosen Essential Oils
Enhance the aroma of your melted wax by adding your desired essential oils, creating a soothing and invigorating experience for your senses. The benefits of different essential oils are vast, allowing you to customize your massage oil candle to your specific needs.
Lavender oil is known for its calming properties, perfect for relaxation and stress relief. If you’re looking for an uplifting scent, try adding a few drops of citrus essential oils like lemon or orange. For a sensual and romantic ambiance, consider using ylang-ylang or jasmine essential oils.
Mixing essential oils is a great way to create a personalized scent that suits your preferences. Once you’ve added the essential oils to the melted wax, gently stir them in to ensure an even distribution of the fragrance.
Now, it’s time to pour the melted wax into the container, creating a beautiful and aromatic massage oil candle.
Pour the Melted Wax into the Container
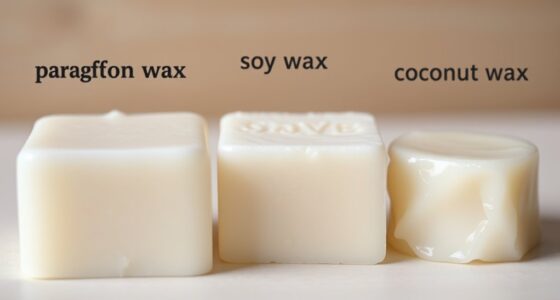
Carefully pour the melted wax into the container, watching as it flows smoothly and fills the space with its warm, liquid glow. This step is crucial in creating your massage oil candle, as it sets the foundation for the final product. Using a different type of wax for massage oil candles can enhance the experience, such as soy wax, which has a lower melting point and provides a longer burning time. Alternatively, you can explore unique alternatives to using a container for the melted wax, like seashells, glass jars, or even hollowed-out fruits. These creative options not only add a touch of aesthetic appeal but also infuse the massage oil candle with a hint of natural fragrance.
The gentle sound of the wax flowing into the container creates a soothing ambiance, instantly calming the mind and body.
The warm glow of the melted wax evokes a sense of relaxation and tranquility, creating a serene atmosphere.
As the container fills up, the anticipation and excitement build, knowing that soon you’ll have a luxurious massage oil candle ready to use.
The fragrant aroma of the melted wax wafts through the air, enveloping the room in a delightful scent that enhances the overall sensory experience.
Now that the melted wax is securely in place, it’s time to move on to the next step and add the wicks, which will bring your massage oil candle to life.
Add the Wicks
After pouring the melted wax into the container, the next step in making a massage oil candle is to add the wicks. Proper wick placement is crucial for the candle to burn evenly and efficiently. To ensure a successful burn, I recommend using a wick centering device or a small metal clip to hold the wick in place.
Place the wick in the center of the container and secure it using the centering device. Make sure the wick is straight and upright, as any crookedness can affect the candle’s performance.
Once the wicks are securely in place, it’s important to pay attention to wick maintenance throughout the candle’s lifespan. Trim the wick to about a quarter of an inch before each use to prevent excessive smoke and soot. This will also help the candle burn evenly and avoid tunneling. Additionally, if you notice the wick mushrooming or producing large flames, extinguish the candle and trim the wick again to maintain a safe burn.
With the wicks properly placed and maintained, it’s time to let the candle cool and set. This step allows the wax to solidify and ensures that the massage oil candle is ready for use.
Let the Candle Cool and Set
Once the wicks are in place, it’s time to allow the candle to cool and solidify, creating a tranquil atmosphere as it sets. During this phase, it is essential to prioritize candle safety precautions to ensure a worry-free experience. Safety should always be the top priority when working with candles, especially as they emit heat and flames. Keep the candle away from flammable objects, never leave it unattended, and place it on a heat-resistant surface.
To provide a visual representation of the process, here is a table outlining the benefits of using massage oil candles:
| Benefits of Using Massage Oil Candles |
|---|
| 1. Provides a soothing ambiance |
| 2. Releases natural fragrance |
| 3. Melts into warm, nourishing oil |
| 4. Promotes relaxation and stress relief |
Massage oil candles offer a unique sensory experience. As they burn, the wax melts into warm, nourishing oil that can be safely massaged onto the skin. This combination of heat, fragrance, and touch creates a truly indulgent and therapeutic experience.
Next, we will learn how to trim the wicks to optimize the candle’s performance and ensure a clean burn.
Trim the Wicks
After letting the massage oil candle cool and set, it’s time to move on to the next step: trimming the wicks. This is an important part of maintaining your candle and ensuring a clean, even burn. Trimming the wicks not only helps to prevent smoking and soot, but it also maximizes the lifespan of your candle.
To trim the wicks, you’ll need a pair of wick trimmers or sharp scissors. Gently lift the wick and trim it to about ¼ inch in length. Be careful not to cut it too short, as this may make it difficult to relight the candle later on. Removing any excess charred debris from the wick is also essential to keep the flame steady and prevent any stray embers.
Now, let’s talk about the benefits of using massage oil candles. Firstly, they provide a soothing and relaxing ambiance with their warm flickering glow. Secondly, the melted oil can be used as a luxurious massage oil, leaving your skin feeling soft and nourished. Lastly, the carefully selected essential oils used in these candles can promote relaxation, reduce stress, and uplift your mood.
With the wicks trimmed and ready to go, it’s time to move on to the next step: lighting the candle and enjoying the soothing aromatherapy it provides.
Light the Candle and Enjoy the Aromatherapy
Now that you’ve trimmed the wicks and prepared your massage oil candle, it’s time to light it up and let the soothing aromatherapy transport you to a state of bliss.
Aromatherapy has long been recognized for its benefits in relaxation and stress relief. By incorporating different types of essential oils into your massage therapy routine, you can enhance the overall experience and promote a sense of calm and well-being.
There are various essential oils that are commonly used in massage therapy. Lavender oil, with its calming and soothing properties, is a popular choice for relaxation. If you’re looking for an invigorating massage, peppermint oil can provide a refreshing and cooling sensation. For a more uplifting experience, consider using citrus oils such as orange or lemon. Each essential oil has its own unique properties and benefits, so you can choose the one that best suits your needs.
Once you’ve lit the candle, allow it to burn for a few minutes until a pool of melted wax forms. This is when the essential oils are released into the air, creating a therapeutic ambiance. It’s important to remember to test the temperature of the melted wax before use to ensure it isn’t too hot.
Transitioning into the next section, it’s crucial to take this precaution to prevent any burns during your massage session.
Test the Temperature of the Melted Wax before Use
Before using the melted wax, be sure to check its temperature to ensure a safe and enjoyable experience. It’s important to use a thermometer when testing the temperature of melted wax because it can help prevent burns and ensure that the wax is at an optimal temperature for massage.
Wax that’s too hot can cause burns, while wax that’s too cool may not provide the desired level of warmth and relaxation.
There are different methods to test the temperature of melted wax before use. One common method is to dip a clean finger into the melted wax and quickly touch it to your inner wrist. If the wax feels comfortably warm, it’s ready for use. Another method is to use a thermometer specifically designed for candle making. Simply insert the thermometer into the melted wax and wait for the reading to stabilize. The ideal temperature for massage oil candles is typically around 110 to 125 degrees Fahrenheit.
Once you’ve confirmed that the melted wax is at the right temperature, you can proceed to give a relaxing massage with your homemade massage oil candle. The warm, soothing oil will help to relax the muscles and provide a luxurious experience.
Give a Relaxing Massage with Your Homemade Massage Oil Candle
Get ready to experience the ultimate in relaxation with your homemade massage oil candle! As the warm, soothing glow of the candle fills the room, you can begin to unwind and let go of the stresses of the day.
Here are some relaxing massage techniques that you can incorporate into your massage session with your homemade massage oil candle:
- Slow, rhythmic strokes: Use long, flowing motions to promote relaxation and help release tension from the muscles.
- Effleurage: This technique involves using light, gliding strokes to warm up the muscles and prepare them for deeper work.
- Petrissage: By kneading and squeezing the muscles, you can help to relieve tightness and knots.
- Aromatherapy: The benefits of aromatherapy can enhance your massage experience. Choose essential oils that promote relaxation, such as lavender or chamomile, and add a few drops to your melted wax before pouring it into the candle.
As you give a relaxing massage with your homemade massage oil candle, remember to listen to your partner’s feedback and adjust your technique accordingly. The combination of the warm candlelight, soothing massage oil, and relaxing massage techniques will create a truly blissful experience.
So go ahead, light that candle and let the relaxation begin!
Frequently Asked Questions
How long does it take for the massage oil candle to cool and set?
To speed up the cooling process of a massage oil candle, you can place it in the refrigerator for about 30 minutes. This will help it solidify faster and be ready to use.
Using a massage oil candle for relaxation has numerous benefits. The warm oil provides a soothing and therapeutic experience, promoting relaxation and relieving muscle tension. The fragrant scent can also enhance the overall calming effect, creating a peaceful ambiance during your massage.
Can I use any type of wax for making a massage oil candle?
Choosing the right wax for a massage oil candle is crucial, like selecting the perfect foundation for a flawless complexion.
While soy wax is popular for candle making, it may not be the best choice for a massage oil candle. Soy wax tends to have a higher melting point, which can lead to a hotter and potentially uncomfortable massage experience.
It’s recommended to use a low-melting-point wax specifically designed for massage oil candles to ensure a soothing and enjoyable massage.
How do I choose the right container for my massage oil candle?
When choosing a container for your massage oil candle, it’s important to consider both functionality and safety concerns. Opt for a heat-resistant material, such as glass or ceramic, to ensure it can withstand the heat of the candle.
Additionally, choose a container with a wide opening to allow for easy access to the melted oil. It’s also crucial to select a container that’s stable and won’t easily tip over during use.
Can I add essential oils to the melted wax for added fragrance?
Yes, you can definitely add essential oils to the melted wax of your massage oil candle to enhance its fragrance. This is a great way to incorporate the benefits of aromatherapy into your massage experience. Essential oils have various therapeutic properties and can help promote relaxation, relieve stress, and uplift mood. When choosing essential oils, consider scents that complement the massage oil and create a soothing atmosphere. Remember to use essential oils sparingly to avoid overpowering the scent.
How often do I need to trim the wicks of my massage oil candle?
To keep your massage oil candle burning beautifully, it’s important to regularly trim the wicks. By trimming the wicks to about 1/4 inch before each use, you ensure a clean and even burn. This simple maintenance task helps prevent excessive smoke, soot, and mushrooming of the wicks.
It also promotes a longer burn time and ensures the fragrance is released effectively. Make it a habit to trim the wicks every time you light your massage oil candle for an optimal experience.
Conclusion
In conclusion, creating your own massage oil candle is a rewarding and soothing experience. By following the steps outlined in this guide, you can enjoy the benefits of aromatherapy and provide a relaxing massage for yourself or your loved ones.
Just like a warm, gentle breeze on a tranquil beach, the massage oil candle will melt away your stress and leave you feeling rejuvenated. So go ahead, gather your supplies and embark on this delightful journey of self-care and relaxation. You deserve it!