
When I admire the soft light of a lit candle, I am reminded of the warm ambiance it creates in my home. But what happens when the flame extinguishes and only a bit of wax remains? Fear not, for I have mastered the art of repurposing and utilizing the leftover candle wax for a multitude of practical uses.
In this guide, I will share with you my expertise on how to transform that seemingly insignificant wax into valuable resources. From crafting new candles and wax melts to sealing envelopes and lubricating stubborn drawers, the possibilities are endless.
With a bit of creativity and a dash of resourcefulness, you can elevate your candle wax remnants from mere leftovers to indispensable household tools.
So join me on this journey of discovery as we delve into the world of repurposing candle wax. Together, we will explore the numerous ways to give new life to these remnants, turning them into something both useful and beautiful.
Let’s unlock the hidden potential of leftover candle wax and embrace the art of repurposing.
Key Takeaways
- Repurpose leftover candle wax by making new candles or scented candles.
- Use leftover candle wax for various household purposes such as lubricating sticky drawers or doors, sealing envelopes, and restoring scratched wood furniture.
- Create wax melts for wax warmers or use cotton balls soaked in wax for fire starters.
- Explore creative uses of leftover candle wax like making waterproof matches, wax crayons, wax sculptures, or custom wax seals.

Ninja SLUSHi Frozen Drink & Slushie Machine with RapidChill Technology | 88 oz. Easy Fill Vessel | 5 Preset Programs | Make Margaritas, Frappés, & More | With Dishwasher Safe Parts | Black | FS301
NO ICE NEEDED: RapidChill Technology is our innovative two-part system that spins an auger around a cooling cylinder...
As an affiliate, we earn on qualifying purchases.
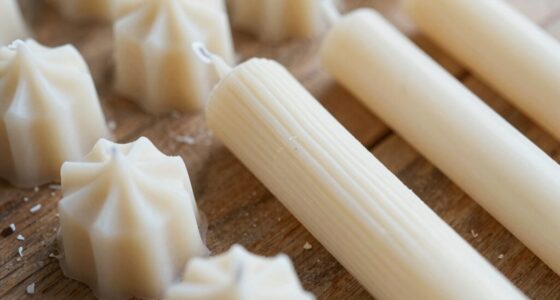
Make new candles
Using leftover candle wax, you can easily create new candles by melting down the wax, adding a wick, and pouring it into a mold. This is a great way to repurpose your old candles and create beautiful, customized candles that suit your preferences.
To make scented candles, simply melt the leftover wax in a double boiler or a heat-safe container over low heat. Once melted, add a few drops of your favorite essential oil to the wax and stir well. This will give your new candle a delightful fragrance.
You can also add decorative elements to your candles by incorporating dried flowers, herbs, or even glitter into the melted wax before pouring it into the mold. This will add a unique and personalized touch to your candles.
Creating wax melts for wax warmers is another fantastic use for leftover candle wax. These are small, scented pieces of wax that can be melted in a wax warmer to release a pleasant aroma throughout your home. They’re easy to make by melting the wax, adding fragrance, and pouring it into small, silicone molds. Once cooled and hardened, you can easily pop them out and use them in your wax warmer.
With these simple techniques, you can put your leftover candle wax to good use and enjoy the soothing ambiance of homemade candles and wax melts.
Create wax melts for wax warmers
To make wax melts for wax warmers, simply melt down your excess candle wax and pour it into adorable molds that’ll fill your home with an aroma so irresistible, it’ll make your nose tingle with delight!
Here are five benefits of using wax melts in wax warmers:
-
Long-lasting fragrance: Wax melts release their scent gradually, providing a consistent and long-lasting fragrance throughout your home.
-
Easy to use: Simply place a wax melt in your wax warmer, turn it on, and enjoy the beautiful scent as it fills the room.
-
No open flame: Unlike traditional candles, wax melts are flameless, making them a safer option, especially if you’ve got children or pets.
-
Variety of scents: With wax melts, you can experiment with different scents to create a cozy and inviting atmosphere. Some popular options include lavender, vanilla, citrus, and fresh linen.
-
Cost-effective: Instead of buying expensive scented candles, using wax melts allows you to repurpose leftover candle wax and save money.
After enjoying the delightful scents of your wax melts, you can move on to the next section and learn how to make fire starters using leftover candle wax.
Make fire starters
Get ready to ignite your adventurous spirit with these homemade fire starters that’ll have you eager to embark on your next outdoor journey. When it comes to camping or bonfires, having a reliable fire starter is crucial. Instead of relying on traditional methods, why not try some fire starter alternatives using leftover candle wax? Not only will you save money, but you’ll also reduce waste.
One simple fire starter technique is to use cotton balls soaked in melted candle wax. All you need to do is melt the wax in a double boiler, dip the cotton balls into the melted wax until they’re completely coated, and let them dry. These wax-coated cotton balls are highly flammable and can be easily lit with a match or a lighter. They burn slowly and provide a steady flame, making them perfect for starting a fire.
Another alternative is to make fire starters using dryer lint and leftover candle wax. Mix the dryer lint with the melted wax until it’s well-coated, then shape the mixture into small balls or cubes. These fire starters can be easily lit and will burn for a long time, giving you enough time to start your fire.
Now that you know how to make these effective fire starters, let’s move on to another creative use for leftover candle wax: sealing envelopes.
Seal envelopes
Now it’s time to add a unique and personal touch to your letters by sealing envelopes with a touch of elegance. Here are three simple ways to seal letters using leftover candle wax:
-
Traditional Wax Seal: Heat a small amount of candle wax and let it drip onto the envelope flap. Press a wax seal stamp into the wax while it’s still soft, creating a personalized design. This method adds a vintage charm to your correspondence and can also be used to preserve old documents.
-
Wax Dots: Instead of using a full wax seal, create small dots of melted wax on the envelope flap. This method is quicker and easier, yet still adds a special touch to your letters. Plus, it allows for a variety of colors and designs, making each envelope unique.
-
Wax Seal Stickers: If you want to achieve a wax seal look without the hassle of melting wax, use pre-made wax seal stickers. These stickers are adhesive and can be easily applied to the envelope flap. They come in various designs, allowing you to select the perfect one for your letter.
Sealing envelopes with candle wax not only adds a touch of elegance but also helps preserve your letters and important documents.
Now, let’s move on to the next section and learn how to lubricate sticky drawers or doors.
Lubricate sticky drawers or doors
When you have a sticky drawer or door that just won’t glide smoothly, using leftover candle wax can be a simple and effective solution. By rubbing wax along the edges of the drawer or door, you can reduce friction and make them slide effortlessly.
This not only prevents squeaking or sticking, but also saves you from the frustration of dealing with stubborn furniture.
Rub wax along the edges of drawers or doors to reduce friction
Smooth out the operation of your drawers or doors by rubbing a thin layer of leftover candle wax along their edges. This technique can effectively reduce friction and lubricate surfaces, making it easier to open and close your drawers or doors. The wax creates a smooth barrier between the surfaces, preventing them from sticking or getting jammed. It’s important to apply a thin layer of wax and evenly distribute it along the edges. Afterward, gently open and close the drawers or doors a few times to help spread the wax evenly. Once the wax is applied, you’ll notice a significant improvement in their movement, as they glide smoothly without any resistance.
Make them glide smoothly
To effortlessly achieve a seamless gliding motion, enhance the movement of your drawers or doors by applying a thin layer of wax along their edges. This simple technique can significantly reduce friction and improve the glide of your furniture. By reducing the friction, the drawers or doors will open and close smoothly, without any effort. To illustrate the effectiveness of this method, take a look at the table below:
| Before Wax Application | After Wax Application |
|---|---|
| Difficulty opening and closing | Effortless glide |
| Jerky movements | Smooth motion |
| Sticking and squeaking | Silent operation |
| Frustration | Convenience |
By following these easy steps and using leftover candle wax, you can transform your furniture into a seamless gliding wonder. In the next section, we will explore how to prevent squeaking or sticking without spending a fortune.
Prevent squeaking or sticking
If you want to eliminate the annoyance of squeaking or sticking, a simple solution is to apply a thin layer of lubricant to your furniture. By doing so, you can prevent rust and reduce friction, ensuring smooth movement and functionality.
When using leftover candle wax as a lubricant, it’s important to choose a non-sticky and long-lasting option. Apply the wax directly onto the areas that are prone to squeaking or sticking, such as hinges or drawer slides. The wax will act as a barrier, preventing metal parts from rubbing against each other and causing friction. This will not only eliminate any squeaking noises but also prolong the lifespan of your furniture.
Moving smoothly and effortlessly, your furniture will regain its functionality and become a joy to use.
Now, let’s move on to the next topic: waterproof matches.
Waterproof matches
Although it may seem unconventional, repurposing leftover candle wax can create waterproof matches. This technique is perfect for outdoor enthusiasts who want to make their own waterproof fire starters or DIY camping gear.
To make waterproof matches, gather some strike-anywhere matches, leftover candle wax, and a small container. First, melt the candle wax in a double boiler or a small heatproof container placed in a pot of boiling water. Once the wax is melted, dip the match heads into the wax, making sure to coat them completely.
Place the coated matches on a heatproof surface to cool and harden. Once the wax has solidified, your waterproof matches are ready to use. When you’re ready to start a fire, simply strike the match against a rough surface, like a rock or a piece of sandpaper, and the wax coating will protect the match from getting wet.
This simple and practical technique is a great way to repurpose leftover candle wax and create a useful camping tool.
Now, let’s move on to the next section about making wax crayons.
Make wax crayons
After learning how to make waterproof matches from leftover candle wax, it’s time to explore another creative use for this versatile material. One of my favorite ways to repurpose candle wax is by making wax crayons. Not only is this a fun and enjoyable activity, but it also allows you to create unique and personalized crayons for yourself or as homemade gifts.
To make your own wax crayons, start by gathering any broken or leftover pieces of colored wax. Sort them by color and remove any wicks or debris. Next, melt the wax in a double boiler until it becomes a smooth liquid. Carefully pour the melted wax into small silicone molds, ensuring that each color has its own section.
Once the wax has cooled and hardened, gently remove the crayons from the molds. You’ll be amazed at the vibrant and beautiful colors that can be achieved with this simple technique. These homemade wax crayons are perfect for creating wax art or for gifting to children and aspiring artists.
Now that you’ve learned how to make wax crayons, it’s time to turn our attention to another practical use for leftover candle wax – repairing scratched wood furniture.
Repair scratched wood furniture
When it comes to repairing scratched wood furniture, one practical and effective method I’ve found is to rub melted wax on the scratches or scuffs. This helps to fill in the damaged areas and restore the appearance of the furniture.
After applying the wax, I then buff it with a soft cloth to blend it in seamlessly. By following these steps, you can easily and inexpensively fix minor scratches and scuffs on your wood furniture, giving it a refreshed and polished look.
Rub melted wax on scratches or scuffs
To fix any scratches or scuffs, simply grab your leftover candle wax and give them a quick rubdown, like magic erasing the blemishes away. It’s amazing how versatile candle wax can be for repairing furniture. Here are a few ways to use it:
-
Using wax for leather care: If you’ve got any leather furniture with scratches, apply a thin layer of melted wax and gently rub it in. This’ll help restore the leather’s natural shine and hide any imperfections.
-
Waxing snowboards and skis: Don’t let scratches ruin your time on the slopes. Rubbing candle wax on the scratched areas of your snowboard or skis can help fill in the gaps and make ’em glide smoothly once again.
-
Protecting wooden surfaces: Apply a layer of melted wax on your wooden furniture to create a protective barrier against future scratches and scuffs.
After rubbing the wax on the scratches or scuffs, remember to buff with a soft cloth to blend in the wax seamlessly.
Buff with a soft cloth to blend in the wax
Gently buff the soft cloth over the waxed surface to seamlessly blend in the smooth, polished finish. The buffing technique is essential in achieving a flawless result when using leftover candle wax to repair scratches or scuffs.
By applying gentle pressure and making circular motions, you can effectively distribute the wax and ensure it is evenly distributed over the damaged area. This technique not only hides the imperfections but also adds a protective layer to the surface, preventing further wear and tear.
Apart from its use in repairing furniture, this buffing technique can also be employed in other alternative uses of leftover candle wax, such as restoring the appearance of leather goods or wooden accessories.
With a bit of practice, you’ll master this technique and be able to seamlessly restore the appearance of your furniture.
Restore the appearance of the furniture
Restoring the appearance of furniture with wax can create a polished and protective finish that adds value and longevity to your pieces. Furniture restoration is a rewarding DIY project that allows you to give new life to old furniture. By using leftover candle wax, you can achieve a professional-looking makeover without breaking the bank. Start by buffing the wax onto the furniture using a soft cloth in a circular motion. This will blend in the wax and create a smooth and even finish. To help you visualize the process, refer to the table below:
| Step | Description |
|---|---|
| 1 | Clean the furniture thoroughly |
| 2 | Apply a thin layer of wax using a soft cloth |
| 3 | Buff the wax in a circular motion for a glossy shine |
By following these steps, you can effortlessly restore the appearance of your furniture and give it a fresh, new look. This DIY furniture makeover is just the beginning of what you can do with leftover candle wax. In the next section, we will explore how to create wax sculptures or molds.
Create wax sculptures or molds
If you’re feeling creative, try your hand at making wax sculptures or molds with your leftover candle wax. Wax art can be a fun and unique way to express your creativity while also repurposing materials.
To begin, gather your leftover candle wax and any molds or containers you want to use. Molds can be found at craft stores or you can even use household items like silicone ice cube trays or plastic containers. Melt the wax in a double boiler or a microwave-safe container, stirring occasionally until it’s completely melted and smooth.
Once the wax is melted, carefully pour it into your chosen molds or containers. If you want to add color or fragrance to your sculptures, you can mix in a few drops of essential oils or candle dye before pouring. Allow the wax to cool and harden completely before removing it from the molds.
With your wax sculptures complete, you can now transition into the next section about using leftover candle wax as a household adhesive. By repurposing your wax in this way, you can save money and reduce waste in your home.
Use as a household adhesive
When it comes to household repairs, leftover candle wax can be a surprisingly handy adhesive. One practical way to use it is to melt the wax and use it to secure loose screws or bolts. It provides a temporary fix for broken items and is easily removable when heated, leaving no residue behind.
Melt wax and use it to secure loose screws or bolts
To melt wax and secure loose screws or bolts, can you imagine how easy it would be to fix things around the house? Not only does it provide a strong adhesive, but it also offers added benefits. Here are a few reasons why using melted wax is a practical solution:
- It helps to secure furniture, preventing it from wobbling or coming apart.
- The wax creates a protective barrier, preventing the screws or bolts from rusting.
- It’s a temporary fix, allowing you to easily remove the wax when needed.
- Melted wax can be applied precisely, ensuring a secure and stable connection.
With these advantages in mind, let’s move on to the next section about using leftover candle wax as a temporary fix for broken items. It’s a handy technique that can save you time and money in the long run.
Use as a temporary fix for broken items
Imagine how relieved you’ll feel when you discover a simple and cost-effective way to temporarily repair your broken items. Leftover candle wax can be a lifesaver in these situations. Not only is it readily available, but it can also be easily melted and used as a temporary fix for household items.
Whether it’s a cracked mug, a loose handle, or a broken figurine, you can apply the melted wax to hold the pieces together until you can find a more permanent solution. This creative use for leftover wax not only saves you money but also allows you to continue using your favorite items without having to replace them right away. Plus, when heated, the wax is easily removable and won’t leave any residue behind.
Now let’s move on to the next section about easily removable and residue-free fixes.
Easily removable and won’t leave residue when heated
Not only is this ingenious hack a convenient solution for broken items, but it also acts like a magical adhesive that vanishes without a trace when heated, leaving no sticky residue behind.
When it comes to heating methods, there are several options you can easily use. One effective method is to place the broken item with the candle wax in a preheated oven at a low temperature. The heat will cause the wax to melt and bind the broken pieces together.
Another alternative use for leftover candle wax is as a lubricant for stubborn zippers. Simply rub a small amount of melted wax along the zipper teeth, and watch as it glides smoothly.
Lastly, you can use melted candle wax to create custom wax seals for letters or invitations, adding a touch of elegance to any correspondence.
Frequently Asked Questions
Can leftover candle wax be used to make homemade beauty products?
Yes, leftover candle wax can be repurposed to make homemade beauty products. By melting the wax and combining it with other natural ingredients like essential oils, shea butter, or coconut oil, you can create your own homemade skincare products.
This allows you to control the ingredients and ensure that you’re using natural beauty products. It’s a practical and cost-effective way to make personalized skincare solutions at home.
Is it safe to use leftover candle wax in cooking or food preparation?
Using leftover candle wax in cooking or food preparation is not safe due to health concerns. Candle wax isn’t meant to be ingested and may contain harmful chemicals or impurities. It’s important to find alternative uses for leftover candle wax, such as making new candles or using it for crafts. When it comes to cooking and food preparation, it’s best to stick to safe and approved ingredients to ensure the health and safety of yourself and others.
Can leftover candle wax be used to create scented candles?
Using leftover candle wax to create unique scented candles is a great way to repurpose it in DIY home decor projects. You can customize the scent to your liking by melting the wax and adding essential oils or fragrance oils. Simply pour the melted wax into candle molds or repurpose old containers as candle holders. This practical method allows you to enjoy the aroma and beauty of scented candles while reducing waste.
How long does leftover candle wax typically last before it becomes unusable?
How long does leftover candle wax typically last before it becomes unusable?
Well, the longevity of candle wax depends on how it’s stored and maintained. If it’s kept in a cool, dry place and protected from dust and moisture, candle wax can last for years. However, over time, it may lose its fragrance and color. But fear not! Even if it’s no longer suitable for making scented candles, there are still plenty of creative ways to repurpose candle wax.
Are there any safety precautions to take when melting and working with leftover candle wax?
When melting and working with leftover candle wax, it’s important to take certain safety precautions.
First, always use a double boiler or a heat-resistant container to melt the wax, as direct heat can cause fires.
Second, never leave the melting wax unattended.
Third, avoid overheating the wax, as it can release toxic fumes.
Lastly, store any leftover wax in a cool, dry place to prevent it from melting or becoming contaminated.
Conclusion
In conclusion, leftover candle wax can be a versatile and practical resource in your home. It can be used for creating new candles and wax melts, sealing envelopes, and lubricating sticky drawers. The uses of leftover candle wax are endless. It can also be used to repair scratched wood furniture and create unique wax sculptures or molds. So, next time you have some leftover candle wax, don’t throw it away. Instead, let your imagination run wild and explore the possibilities that this humble wax can offer. Embrace the transformative power of wax and let its molten magic bring new life to your surroundings.