
Finding candle wax on your clothing can create a messy situation, but don’t worry! Getting rid of wax stains is simpler than you may think. It’s like working through a puzzle – each step helps in bringing your clothing back to its original state.
In this article, I will guide you through the process of getting candle wax out of clothes, step by step.
First, we need to assess the damage and determine the best course of action. Then, we’ll scrape off any excess wax using a blunt object.
Next, we’ll freeze the remaining wax to make it easier to remove. Once frozen, we’ll carefully lift off the hardened wax from the fabric.
After that, it’s time for heat and absorbent materials to work their magic. We’ll apply heat using an iron and place an absorbent material over the stain to draw out any remaining residue.
If there’s still a stain left behind, don’t worry – I’ve got some tricks up my sleeve for treating it too.
Lastly, we’ll launder the garment as usual and air dry it before inspecting for any lingering traces of wax.
By following these steps, you’ll be able to conquer those pesky candle wax stains with ease. So let’s get started and bid farewell to those waxy woes!
Key Takeaways
- Assess the damage and remove excess wax by scraping it off with a dull knife or spoon.
- Freeze the remaining wax by placing the garment in a plastic bag in the freezer for about an hour, then gently scrape off the hardened wax without damaging the fabric.
- Apply heat and absorbent materials by using an iron with a paper towel or brown paper bag, or applying a stain remover or rubbing alcohol to dissolve any residue.
- Launder the garment as usual, air dry it, and inspect for any lingering traces of wax before following proper washing instructions.

Yankee Candle Home Sweet Home Scented Candle, 22oz Large Jar, Up to 150 Hour Burn Time, Giftable
Home Sweet Home: Home, where you always feel welcome and at ease; it's where the heart is. This...
As an affiliate, we earn on qualifying purchases.
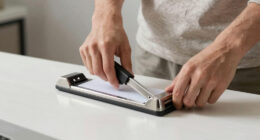
Assess the Damage
Oh no, the candle wax has ruined my favorite shirt! When it comes to getting candle wax out of clothes, the first step is to assess the damage. Look closely at the affected area and determine how much wax has been absorbed by the fabric. This will help you determine the best course of action to take.
To prevent future wax stains, it’s important to act quickly. As soon as you notice the spill, remove any excess wax from the surface of the fabric. Gently scrape off as much as possible using a dull knife or spoon. Be careful not to push the wax further into the fabric or spread it around.
Once you’ve assessed the damage and removed any excess wax, it’s time to move on to the next step: scraping off excess wax. By following these steps and acting promptly, you can increase your chances of successfully removing candle wax from your clothes without causing any further damage.

Scented Candles for Home,8 Pack Soy Wax Candle Set,Scented Candles Gift Set,Aromatherapy Candles, Amber Jar Vintage Apothecary Style, 8 Scents Gift Set
8 Pack Scented Candle Set – Great Value & Variety:Enjoy 8 different scented candles in one set, offering...
As an affiliate, we earn on qualifying purchases.
Scrape off Excess Wax
To effectively remove candle wax from clothes, the first step is to scrape off any excess wax using a dull knife or spoon. It’s important to be cautious and gentle during this process to avoid causing any damage to the fabric.
By carefully removing solidified wax in this manner, you can prepare the garment for further cleaning methods.
Use a dull knife or spoon to gently remove any solidified wax
Gently scrape away the hardened wax using a dull knife or spoon. This step is crucial in removing candle wax from clothes. By using a dull tool, you can avoid damaging the fabric while effectively removing the solidified wax.
If you have used the freeze method to harden the wax, it should be easier to scrape off. However, if you have used the heat method to soften the wax, be cautious not to apply too much pressure as it may push the softened wax deeper into the fabric.
It is important to take your time and gently remove as much of the solidified wax as possible before proceeding to other removal methods. Be careful not to damage the fabric during this process and ensure that all visible chunks of wax are removed before moving on to treating any remaining residue or stains.
Be careful not to damage the fabric
Make sure to be cautious and avoid causing any harm to the fabric while removing the solidified wax. To prevent future wax stains, consider using these alternative methods for removing wax from clothes:
-
Place a paper towel or brown paper bag over the wax, and then iron it with a warm iron. The heat will cause the wax to transfer onto the paper.
-
Use an ice cube to freeze the remaining wax. Once frozen, gently scrape it off with a dull knife or spoon.
-
Apply a stain remover or rubbing alcohol to help dissolve any residue left behind.
By following these techniques, you can effectively remove candle wax without damaging your clothing.
Now that you’ve removed the solidified wax, let’s move on to freezing the remaining residue for easy removal.

4 Pack Scented Candles Gifts for Women: 28oz Natural Soy Candles for Home Scented, Up to 200H Burning, Aromatherapy Candle Set, Jar Candle Gift Set for Spa Bath Meditation Birthday Valentine's Gifts
🎁 PERFECT GIFT-READY CANDLES FOR WOMEN - This beautiful scented candle comes with a pretty package, creating a...
As an affiliate, we earn on qualifying purchases.
Freeze the Wax
Freezing the wax is a clever method to salvage your clothes from unwanted stains. When candle wax drips onto fabric, it can be quite frustrating to remove. However, by freezing the wax, you can make it easier to scrape off without causing damage to the fabric.
To freeze the wax, follow these simple steps:
- Place your garment in a plastic bag and seal it tightly.
- Put the bagged garment in your freezer for about an hour or until the wax becomes hard and brittle.
- Once frozen, take out the garment and lay it on a flat surface.
The frozen wax will now be easier to remove without leaving any residue behind. Take a dull knife or spoon and gently scrape off as much of the hardened wax as possible. Be careful not to dig into the fabric or use excessive force which could cause further damage.
By freezing the wax first, you minimize the risk of spreading it further into the fabric fibers. In my next section about ‘remove the frozen wax’, I will explain how to safely get rid of any remaining traces without damaging your clothes further.

BlissfulOasis Scented Candles Set, 17.6 oz 4 Pack Home Scented Candles, 100-120 Hours Candle Set for Men Dad Women, Long Lasting Soy Wax Aromatherapy Gift for Birthday, Fathers Day, Mother's Day
[4 Different Fragrances] Each set of BlissfulOasis scented candles contains four different scents of scented candles: Lavender, Lemon,...
As an affiliate, we earn on qualifying purchases.
Remove the Frozen Wax
To safely eliminate any remaining traces, the next step is to carefully scrape off as much of the hardened wax as possible without causing further damage to your garments. Start by using a dull knife or spoon to gently lift the frozen wax from the fabric. Be cautious not to push too hard, as this can spread the stain and embed it deeper into the fibers.
Once you’ve removed most of the wax, you can tackle any residual stains left behind. Place a clean white cloth or paper towel over the stained area and apply a warm iron on top. The heat will help transfer the remaining wax onto the absorbent material. Remember to use low heat settings and avoid direct contact between the iron and fabric to prevent any accidental scorching.
Continue moving the cloth or paper towel around, using fresh sections as needed until no more wax transfers onto it. This method should effectively remove wax stains from your clothes while preventing future ones.
Now that you’ve successfully removed most of the frozen wax and eliminated any visible stains, let’s move on to applying heat and absorbent material to completely restore your garment’s original condition without leaving any residue behind.
Apply Heat and Absorbent Material
When it comes to removing candle wax from clothes, one effective method is to apply heat and absorbent material.
To do this, I would first place a clean cloth or paper towel over the wax stain. Then, using a clothes iron on a low heat setting, I would gently heat the cloth. This will help to melt the wax and transfer it onto the absorbent material, effectively removing it from the clothing.
Place a clean cloth or paper towel over the wax stain
Using a clean cloth or paper towel, simply lay it over the wax stain and let the magic happen. This is one of the most effective tips for removing candle wax from clothes. Here’s why it works:
-
Absorption: The cloth or paper towel will absorb the heat from the iron and help draw out the melted wax.
-
Protection: Placing a barrier between the iron and your clothes prevents direct contact, reducing the risk of damaging the fabric.
-
Easy Cleanup: As the cloth absorbs the wax, it becomes easier to remove any residue left behind.
To further tackle this pesky stain, continue with using a clothes iron on a low heat setting to gently heat the cloth. By doing so, you can effectively melt away more of that stubborn wax without causing harm to your beloved garments.
Use a clothes iron on a low heat setting to gently heat the cloth
Start by gently heating the cloth with a clothes iron on low heat. This method is effective in removing wax stains from clothes and preventing them from setting further into the fabric. The heat helps to melt the wax, allowing it to transfer onto the clean cloth or paper towel placed over the stain.
To illustrate this process, imagine a 3 column and 3 row table. In the first column, you have your clothing item with a candle wax stain. In the second column, place a clean cloth or paper towel over the stain. And in the third column, use a clothes iron on low heat to gently heat the cloth.
By following these steps, you can easily remove wax stains and prevent them from becoming permanent marks on your favorite garments. Now that we have heated the cloth, let’s move on to blotting the stain to complete the process smoothly.
Blot the Stain
First, you’ll want to gently press a clean white cloth against the wax stain on your clothes. This will help absorb some of the melted wax and prevent it from spreading further onto your clothing. Be sure to use a white cloth as colored ones may transfer dye onto your clothes and create additional stains.
If there’s still some residual wax left on the fabric after blotting, you can try using alternative methods to remove it. One method is placing a brown paper bag or parchment paper over the stained area and running a warm iron over it. The heat from the iron will melt the wax, which will then be absorbed by the paper.
Another alternative method is freezing the garment. Place it in a plastic bag and put it in your freezer for a few hours until the wax hardens. Once hardened, carefully scrape off as much of the wax as possible with a butter knife or credit card.
After removing most of the wax, you can move on to treating any residual stain that may remain on your clothes without needing any further steps.
Treat any Residual Stain
After blotting the stain as much as possible, it’s time to tackle any residual wax that may be left on your clothes. This step is crucial in order to completely remove the candle wax and prevent any potential stains from setting in.
There are several effective methods you can try to treat stubborn stains caused by candle wax. Here are a few alternative methods that you can consider:
-
Using an iron and paper towels: Place a paper towel over the remaining wax and gently iron over it. The heat will melt the wax, which will then be absorbed by the paper towel.
-
Freezing method: Place your clothing item in a plastic bag and put it in the freezer for about 30 minutes. Once frozen, carefully scrape off the hardened wax with a butter knife or credit card.
-
Dish detergent solution: Mix some dish detergent with warm water and apply it directly to the stained area. Gently rub the fabric together to lift off any remaining residue.
-
Alcohol or rubbing alcohol: Dab some alcohol onto a clean cloth or cotton ball, then blot the stained area until all traces of wax are gone.
By treating any residual stain using these alternative methods, you’ll ensure that your clothes are free from both visible wax and potential discoloration. Now let’s move on to checking for any lingering wax…
Check for any Lingering Wax
Make sure to thoroughly inspect your garments for any remnants of the stubborn candle wax, like hidden droplets waiting to resurface and stain your outfit.
Although you may have already removed the bulk of the wax, it’s important to check for any lingering residue or discoloration that could ruin your clothes if left untreated.
Start by carefully examining the affected area under bright light. Look for any traces of wax that might have seeped into the fabric fibers. If you spot any remaining wax, don’t pick or scrape it off as this could further damage the fabric. Instead, move on to the next step: determining the fabric type.
Different fabrics require different treatment methods, so identifying what material your garment is made from will help you choose the most effective removal technique. Check if it’s cotton, polyester, silk, or another type of fabric before proceeding with stain removal.
Once you have checked for discoloration and determined the fabric type, you can then move on to laundering the garment. By following specific washing instructions tailored to your fabric type, you can successfully remove any residual stains and restore your clothes back to their original condition.
Continuing with proper care will ensure a successful outcome in getting rid of candle wax from clothing without causing further damage during future laundering processes.
Launder the Garment
To launder the garment and remove any remaining stains, it’s important to follow the fabric care instructions. I usually check the label for specific washing instructions such as water temperature, cycle type, and whether or not it can be tumble dried. If there are still stains after washing, using a stain remover or laundry detergent specifically designed for removing tough stains can help get rid of them effectively.
By following these steps, you can ensure that your garment comes out clean and stain-free.
Wash the garment according to the fabric care instructions
Follow the fabric care instructions and let your worries melt away as you wash the garment.
Before proceeding, assess the damage by checking for any remaining wax on the fabric. If there’s still wax present, it’s important to remove it before washing.
Once you’ve assessed the situation, refer to the fabric care instructions provided on the garment label. These instructions will guide you in determining the appropriate water temperature, cycle setting, and laundry detergent to use. It’s essential to follow these guidelines to ensure that your garment is washed properly without causing any further damage or shrinkage.
After washing according to the fabric care instructions, check for any remaining stains caused by the candle wax.
In our next section, we’ll discuss how to use a stain remover or laundry detergent for any remaining stains.
Use a stain remover or laundry detergent for any remaining stains
Luckily, there’s a magical elixir that can banish those stubborn stains caused by the pesky candle wax – a stain remover or laundry detergent. When dealing with candle wax on clothes, it’s important to tackle any remaining stains after washing the garment according to the fabric care instructions.
To do this effectively, here are three laundry techniques and stain removal methods you can try:
- Apply a stain remover directly onto the affected area and gently rub it in.
- Let the stain remover sit for a few minutes to penetrate and break down the wax.
- Wash the garment again using laundry detergent and follow the fabric care instructions.
By using these effective techniques, you can ensure that your clothes are free from any residual wax stains.
Now, let’s move on to how to air dry and inspect your clothing for complete stain removal.
Air Dry and Inspect
After allowing the clothes to air dry, I carefully examine them for any remaining traces of candle wax. Inspecting techniques are crucial at this stage to ensure that all the wax has been removed.
First, I run my fingers over the fabric, feeling for any hardened or waxy residue. If I detect anything, I gently scrape it off using a dull knife or spoon.
Next, I inspect the garment under bright light to spot any faint stains that may have been left behind.
Drying methods play a significant role in removing candle wax from clothes. Air drying is one of the most effective ways to eliminate wax stains because it allows the wax to harden and become brittle, making it easier to remove. By avoiding heat sources such as hair dryers or direct sunlight, you prevent further damage to the fabric and ensure that the stain doesn’t set permanently.
Inspecting and drying techniques are essential steps in getting candle wax out of clothes successfully. By being thorough during inspection and utilizing proper drying methods like air drying, you can effectively eliminate any remaining traces of candle wax on your garments without causing further damage or setting stains permanently.
Frequently Asked Questions
Can I use a hairdryer to remove the wax from clothes?
Yes, you can use a hairdryer to remove wax from clothes. By applying heat to the wax, it softens and becomes easier to remove. However, it’s important to exercise caution by using a low heat setting and placing a paper towel or cloth over the wax before applying the hairdryer. Alternatively, you can also try freezing the wax with ice cubes and then gently scraping it off with a butter knife.
How long should I freeze the wax before attempting to remove it?
I recommend leaving the wax in the freezer for at least two hours before attempting to remove it. Freezing the wax helps harden it, making it easier to scrape off.
However, there are alternative methods for removing wax stains from clothes. One method is to place a brown paper bag or a cloth over the wax and apply heat with an iron. The heat will melt the wax, allowing it to transfer onto the paper or cloth.
Can I use paper towels instead of an absorbent material to remove the wax?
Using paper towels as an alternative material to remove candle wax from clothes isn’t the most effective method. They can absorb some of the wax, but it may not completely remove it from the fabric. It’s better to use an absorbent material like brown paper or a cloth towel. This will help draw out more of the melted wax. Remember, "Old habits die hard," so stick to tried and true methods for best results.
Will ironing the stained area with a paper bag really work?
Scraping off the excess wax before ironing with a paper bag does make a difference in removing the stain. The pressure from scraping helps to remove as much wax as possible, allowing the heat from the iron to penetrate deeper into the fabric and lift any remaining residue.
However, if you prefer not to use heat, there are alternative methods available such as freezing the wax and then carefully picking or scraping it off using a dull knife or spoon.
Can I use any laundry detergent to treat the residual stain?
Sure, you could use any laundry detergent to treat the residual stain from candle wax on your clothes. But why settle for the ordinary when there are natural alternatives that can work wonders?
For instance, try using a mixture of baking soda and vinegar or rubbing alcohol to gently remove the wax. These methods are not only effective but also environmentally friendly.
So, step away from the standard detergent and embrace the power of nature!
Conclusion
In conclusion, removing candle wax from clothes is a delicate task that requires patience and precision. Just like tackling life’s challenges, it’s important to assess the damage and scrape away any excess negativity.
Freezing the wax helps solidify our fears, making them easier to remove. Applying heat and absorbent material symbolizes facing our problems head-on and absorbing their lessons.
Treating any residual stain represents healing emotional wounds, while checking for lingering wax reminds us to stay vigilant in maintaining our mental clarity. Finally, laundering the garment signifies cleansing ourselves of negativity, allowing us to air dry and inspect our newfound strength.