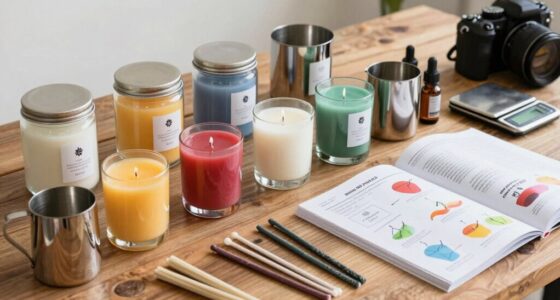
Connect with us

Beginners Guides

Soy Wax Candles – Why Does My Soy Wax Candle Not Smell?

Published

on

Why does my soy wax candle not smell

By default, soy wax candles come unscented. Yet, it’s possible to infuse them with fragrance oils. In this article, we’ll guide you through the process of incorporating fragrance oil into soy wax candles. Additionally, this piece offers insights on selecting the appropriate wick size for your soy candle.

How to add fragrance oils for soy wax candles

You may be wondering how to make soy wax candles. The first step is to make sure your soy wax is at least 170 degrees F before adding the fragrance oil. Once the wax has reached the right temperature, you can add your fragrance oil.

Different waxes require different pouring temperatures. Before adding fragrance oil to soy wax candles, it is important to measure the amount. After adding the oil, the candle should cool for at least 12 hours. This is necessary for the fragrance oil and wax to set properly.

Make soy wax candles by adding 3 Tablespoons fragrance oil to 2 cups melted wax. Mix the mixture for 2 minutes. Microwave the mixture for 30 seconds if the fragrance oil isn’t fully incorporated. When adding the fragrance oil, you must wait until the wax reaches 175 to 185 degrees. This process can take a few minutes, so be patient.

Your personal preferences and the oil’s density will determine how much fragrance you add. The best fragrance level for soy wax candles is between six and ten percent. Several different fragrance oils have different scent profiles, so you should experiment with fragrance loads to see which one works best for you.

How to choose the right wick size in a soy wax candle

The size of the wick determines how thick the candle will be. A 3.5-inch-diameter candle is ideal for a single wick, while larger candles may require two or more wicks. The wick size you choose will also depend on the amount of fragrance oil and color used in the candle. Candles with strong fragrance oils and colors usually require larger wicks.

There are several factors that can impact the final result when it comes to choosing the right wick size for your soy wax candle. The right size will ensure that the candle burns evenly, has strong scent throw, and is free of toxins. In order to find the right wick size, you can use a ruler or the dimensions of the candle container.

You want to avoid a stale or ominous candle. Make sure the wick is in good shape. If you notice a mushroom-like growth on the wick, you may have an oversized wick. If this happens, cut the wick to a smaller size so that it burns cleaner. A trimmed wick will help prevent the candle from crumbling and curling.

In addition to determining the right wick size, you should also consider the type of container your soy wax candle will be placed in. To ensure even burning, some candle types may require more than one wick. A narrow candle might only require one wick while a large container may need two.

How to cool a soy wax candle

Soy wax candles can develop a problem called sink hole, which is caused by air trapped inside the wax during the manufacturing process. This air then works its way up to the surface of the candle and causes it to not smell as it should. There are solutions to this problem. You can first check to make sure your candle wick does not have too much or too little. You can also check for bubbles in the wax.

Soy wax can also frost eventually. This is a minor issue, as long as the candle is not too hot, but it can cause a visual problem. In order to prevent the soy wax candle from frost, try to avoid agitating the candle too much. Over-agitating the wax can increase crystallization, which can lead to frosting. Another way to minimize the frost is to pre-heat the glassware. It is important to remember that hot glassware should not be heated above 100 degrees F.

During cooling, the wax temperature should not be lower than it is. While pouring the wax, you should keep a fan on. This will help the wax cool down more slowly. Pre-heating your glassware before pouring the wax will prevent it from pulling away from your glass. You should also pour the wax slowly to minimize air bubbles. To release any bubbles, tap the container.

I'm Amelia, and I love making candles. It all started when I was given a kit as a gift. I loved the process so much that I decided to make my own candles. I soon realized that I had a real talent for it. Before long, my friends and family were asking me to make candles for them too. Word spread, and soon I was inundated with orders. I love the creativity that goes into making each candle unique. And I love the satisfaction of knowing that people are using something I made with my own hands.

Continue Reading

Beginners Guides

How To Trim A Candle Wick

Published

on

By

An image that showcases a close-up view of a hand holding a sharp pair of scissors poised above a candle

Cutting back a candle wick might appear to be an easy chore, yet it’s crucial for ensuring a burn that is both safe and effective. Envision the following scenario: a comforting flame flickers, projecting playful shadows around your snug living room. Then, picture that very flame stuttering and emitting smoke, barely keeping alive. This is the moment when correct wick maintenance proves its importance.

By taking just a few minutes to trim your candle wick, you can ensure a clean and even burn every time. In this article, I will guide you through the step-by-step process of trimming a candle wick with precision and care. From gathering your supplies to using the right technique, I’ll provide all the knowledge you need to confidently maintain optimal burning conditions for your favorite candles.

So let’s get started on this journey towards safer and more enjoyable candlelit moments!

Key Takeaways

  • Trimming the wick to approximately 1/4 inch ensures a clean and even burn.
  • Proper wick maintenance prolongs the life of the candle and prevents accidents.
  • Dispose of trimmed wick in a safe manner to prevent fire hazards.
  • Use a candle snuffer to extinguish the flame and prevent debris from falling into the wax.

Gather your supplies: scissors, a candle, and a candle snuffer if desired.

Get your scissors, candle, and candle snuffer ready because we’re about to learn how to trim a candle wick! Candle wick maintenance is an essential part of ensuring that your candles burn evenly and efficiently. Trimming the wick helps prevent excessive flickering, smoking, and uneven burning. It’s a simple task that can significantly extend the life of your candles.

To begin, gather all the necessary supplies: scissors for trimming, a candle to work on, and a candle snuffer if desired. The benefit of using a candle snuffer is that it extinguishes the flame without blowing hot wax around or creating smoke. It’s also safer than attempting to blow out the flame directly with your mouth.

Once you have everything ready, ensure the candle is completely cooled and not lit. This step is crucial for safety reasons as working with a lit or hot candle can be dangerous. Allow enough time for the wax to solidify fully before proceeding with any maintenance tasks.

Now that we’ve prepared our supplies and ensured safety precautions are in place, let’s move on to the next section about ensuring proper wick length for optimal burning performance.

Ensure the candle is completely cooled and not lit.

Once the flame has faded and the wax has hardened, you can safely give your candle’s wick a little haircut to ensure it burns brightly. Proper wick care is essential for maintaining a clean and efficient burn, as well as prolonging the life of your candle.

To begin, make sure the candle is completely cooled and not lit to avoid any potential accidents.

To trim the wick, gather your supplies: scissors, a candle, and optionally, a candle snuffer for added convenience. Take your scissors and carefully cut off any excess length from the wick. It’s important to remove any debris or excess wick from the candle surface before proceeding further.

Removing wick debris ensures that the flame burns evenly without flickering or producing excessive smoke. This step also prevents any loose bits of charred wick from falling into the melted wax pool while burning.

Now that you’ve trimmed the wick and removed any debris or excess wick from the surface of your candle, you’re ready to move on to the next step: ensuring an even burn by properly lighting your candle.

Remove any debris or excess wick from the candle surface.

After ensuring a safe and cool environment, it’s crucial to clear away any debris or excess wick from the surface of your candle for an optimal burning experience. Proper wick maintenance is essential for both candle safety and longevity. To achieve this, follow these simple steps:

  1. Gather the necessary tools: a pair of scissors and a small brush or cloth.
  2. Carefully examine the surface of the candle and remove any loose debris such as burnt wick pieces or dust using the brush or cloth.
  3. Next, focus on trimming the wick. A well-trimmed wick ensures a clean and even burn while preventing excessive smoke and soot formation. Imagine you have three different lengths of wicks in front of you, each representing a different scenario during trimming.
Wick Length Description
Too long The flame may flicker excessively, causing uneven melting and potential dripping. It can also produce more smoke than desired.
Too short The flame may struggle to stay lit, resulting in an incomplete burn pool that wastes wax along with diminished fragrance throw.
Ideal A properly trimmed wick is approximately 1/4 inch long. It promotes steady burning with minimal smoke emission.

Now that we’ve cleared away any debris and understood the importance of proper wick length, let’s move on to the next step: holding the scissors at a 45-degree angle and trimming the wick accordingly without cutting all the way down to prevent excessive fallout into your candle wax reservoir area

Hold the scissors at a 45-degree angle and trim the wick to approximately 1/4 inch.

To achieve the optimal burn, carefully position the scissors at a 45-degree angle and trim the wick to around 1/4 inch in length. Wick trimming techniques are essential for maintaining a clean and efficient burn.

When it comes to trimming your candle wick, there are a few common mistakes you should avoid. First and foremost, make sure to remove any debris or excess wick from the candle surface before starting. This will ensure an even and consistent burn throughout the life of your candle.

Once you have cleared away any debris, take your scissors and hold them at a 45-degree angle to the wick. This angle allows for precise trimming without cutting too close to the wax surface. Trim the wick down to approximately 1/4 inch in length, ensuring that it is evenly cut all around.

It’s important not to cut the wick too short as it may be difficult to relight later on. A shorter wick can also cause uneven burning, leading to wasted wax and reduced overall burn time. By following these simple steps and avoiding common mistakes in wick trimming, you can ensure a longer-lasting candle with an optimal burn every time.

Be careful not to cut the wick too short, as it may be difficult to relight if it becomes too small. Moving onto our next section about being cautious during this process…

Be careful not to cut the wick too short, as it may be difficult to relight.

Make sure you don’t trim the wick too short, as it can be challenging to relight if it becomes too small. Proper wick maintenance is essential for a clean and efficient burn, as well as preventing wick debris from falling into the wax. To achieve this, hold your scissors at a 45-degree angle and trim the wick to approximately 1/4 inch. By doing so, you create an optimal length that allows for a steady flame while minimizing smoke and soot.

To emphasize the importance of trimming the wick correctly, consider the following table:

Wick Length Flame Quality Smoke Production
Too short Weak Minimal
Optimal Steady None
Too long Large Excessive

Maintaining an ideal wick length not only ensures a better burning experience but also extends the life of your candle. Remember, safety should always be a priority when handling candles. Once you have trimmed the wick to perfection, dispose of the trimmed wick in a safe manner before lighting your candle again. This will help prevent any potential fire hazards or accidental mishaps.

Transitioning into our next section about disposing of the trimmed wick in a safe manner…

Dispose of the trimmed wick in a safe manner.

When disposing of the trimmed wick, remember to handle it carefully and dispose of it in a safe manner to prevent any potential hazards or accidents. Did you know that approximately 8% of candle-related fires are caused by improper disposal of wick trimmings?

To ensure safe disposal, there are a few key steps to follow. Firstly, make sure the trimmed wick is completely extinguished before handling it. This can be done by gently blowing on it or using a tool like tweezers to smother the flame. Once the wick is no longer lit, use a tissue or paper towel to pick up the trimmed portion. Avoid touching it directly with your hands as residual heat may still be present.

To properly dispose of the trimmed wick, consider placing it in a designated container such as an empty metal tin or glass jar. This will help contain any potential fire risks and minimize environmental impact. Avoid throwing the wick trimmings into regular trash bins as they may still pose a fire hazard.

By following these safe disposal practices, not only can you prevent accidents but also contribute towards reducing environmental harm caused by improper waste management.

Now that we’ve taken care of trimming and disposing of the wick, let’s move on to lighting the candle and enjoying a clean and even burn without any worries about safety or waste management concerns.

Light the candle and enjoy a clean and even burn.

After disposing of the trimmed wick in a safe manner, it’s time to light the candle and enjoy a clean and even burn. As an expert candle enthusiast, I can assure you that this step is crucial for maximizing the benefits of your candle.

Before lighting, take a moment to inspect the candle’s surface for any leftover debris or dust. Gently clean off any wax residue to ensure an optimal burning experience.

Now, let’s talk about lighting techniques. While some people use matches or lighters, I highly recommend using a candle snuffer. This handy tool not only adds elegance to your ritual but also prevents unnecessary smoke and wax splatters caused by blowing out the flame. The benefits of using a candle snuffer are twofold – it creates minimal disturbance to the surrounding air and reduces soot build-up on the container walls.

Once you’ve lit your candle using a snuffer, sit back and relish in its warm glow and enchanting fragrance. Remember, safety should always be prioritized when enjoying candles; never leave them unattended or near flammable objects.

As we move forward, it’s essential to repeat the trimming process each time before relighting the candle…

Repeat the trimming process each time before relighting the candle.

To ensure a clean and even burn, always remember to trim the wick before relighting. Trimming the wick regularly is vital for maintaining the quality and longevity of your candle. But how often should you trim a candle wick?

The general rule of thumb is to trim it to about ¼ inch before each use. This ensures that the flame stays at an optimal height, preventing excessive flickering or smoking.

Why is it important to trim a candle wick regularly? Well, an untrimmed wick can lead to several issues. Firstly, it can cause the flame to become too large and produce more heat than necessary, which can result in uneven burning and potential wax spills. Secondly, an untrimmed wick tends to create black smoke and soot, which can stain your walls or ceiling over time.

By trimming the wick before relighting, you not only promote a clean and even burn but also prevent any potential accidents. So make it a habit to grab your trusty pair of scissors or a specialized wick trimmer each time you go to light your candle.

Now that we know how crucial trimming is for proper candle maintenance, let’s move on to another important tip: using a candle snuffer to extinguish the flame instead of blowing it out. This simple action can help prevent any debris from falling into the wax and keep your candle burning smoothly.

Use a candle snuffer to extinguish the flame instead of blowing it out, as this can help prevent wick debris from falling into the wax.

Snuff out the flame with a candle snuffer like a graceful dance partner, protecting your wax from any unwanted wick debris. By using a candle snuffer to extinguish the flame instead of blowing it out, you can prevent wick debris from falling into the wax and causing potential hazards or messes. This simple tool offers several benefits when it comes to maintaining the cleanliness and quality of your candles.

To illustrate its effectiveness, let’s take a closer look at some key advantages of using a candle snuffer:

Candle Snuffer Benefits
Prevents Wick Debris
Promotes Safety
Enhances Aesthetics

Preventing wick debris is crucial for optimal burning conditions. When you blow out a candle, the force can dislodge small fragments of burned wick that then fall into the melted wax. Over time, these debris particles can clog the wick and affect its ability to burn evenly. Using a candle snuffer eliminates this risk entirely.

Now that we understand how beneficial a candle snuffer can be in preventing wick debris, let’s explore why it’s essential to regularly check and trim the wick as needed to maintain optimal burning conditions without disrupting the overall experience.

Regularly check and trim the wick as needed to maintain optimal burning conditions

Regularly checking and trimming the wick ensures an optimal burning experience, keeping your candle glowing beautifully. Proper wick maintenance is crucial for promoting even and clean candle burning. Here are some essential steps to follow:

  • Begin by examining the length of the wick. Ideally, it should be trimmed to about ¼ inch before lighting. This prevents excessive flickering and reduces the risk of soot formation.
  • Use a pair of sharp scissors or wick trimmers to cut off any excess length. Be careful not to cut too short; leaving a bit of length helps maintain a steady flame.
  • Remove any debris or carbon buildup from the trimmed end of the wick. This can be done using a tissue or a small brush specifically designed for this purpose.

After trimming, make sure there are no loose trimmings left in the wax pool. They can cause uneven burning and potentially lead to accidents.

By regularly checking and trimming your candle’s wick, you ensure that it burns efficiently, without excessive smoke or soot formation. This simple maintenance routine will help prolong the life of your candles while providing you with a consistent and enjoyable glow each time you light them up.

Frequently Asked Questions

Can I use any type of scissors to trim the candle wick?

Absolutely! When it comes to trimming candle wicks, you can use any type of scissors. You have a variety of scissor options at your disposal, from small craft scissors to sharp manicure scissors. The choice is yours. However, it’s essential to keep in mind that using specialized wick trimmers is the best way to go. They’re specifically designed for this task and ensure a clean cut without damaging the candle. Now, let’s dive into some tips for trimming candle wicks without any harm to your precious candles.

How often should I trim the candle wick?

I recommend trimming the candle wick before each use. It’s best to trim it to about 1/4 inch in length for optimal burning and to prevent excessive smoke or flickering.

Regularly trimming the wick helps maintain a clean and even burn, prolonging the life of your candle. By following these best practices for trimming wicks, you’ll ensure a safer and more enjoyable candle experience.

What should I do if the wick is too short to relight?

If you find that your candle’s wick is too short to relight, don’t worry! There are a few techniques you can try to lengthen the wick.

One option is using a pencil or a toothpick to gently push the wick up towards the surface of the wax.

Another method is carefully unraveling the end of the wick with your fingers.

If these methods don’t work, you can also use a matchstick or a lighter to ignite the candle directly from its side.

Remember, safety first!

Is it safe to dispose of the trimmed wick in the regular trash?

Proper disposal methods for trimmed candle wicks are important to consider. It’s not recommended to dispose of them in the regular trash due to their potential environmental impact.

Instead, it’s best to find alternative methods such as recycling or composting. Recycling programs may accept certain types of wicks made from natural materials like cotton or hemp.

Composting is another eco-friendly option, as these organic materials can break down naturally and contribute to nutrient-rich soil.

What are the optimal burning conditions for a candle?

To achieve the best burning experience, candle placement is crucial. Consider positioning your candle away from drafts and flammable objects. Additionally, factors like wick length, container size, and wax quality play a significant role in the quality of the burn. A shorter wick promotes a cleaner flame and prevents excessive smoke. The ideal conditions for optimal burning involve careful attention to these details to ensure both safety and an enjoyable atmosphere.

Conclusion

In conclusion, trimming a candle wick is a simple yet essential step to ensure a clean and even burn. By following the steps outlined above, you can maintain optimal burning conditions and enjoy the full benefits of your favorite candles.

Remember to regularly check and trim the wick as needed, using a candle snuffer to extinguish the flame for added convenience.

So go ahead, indulge in the cozy ambiance and comforting glow of a well-trimmed candle – it’s truly a delight for all the senses.

Continue Reading

Beginners Guides

How To Remove Candle Soot From Walls

Published

on

By

-up image of a white, textured wall with visible black soot stains at varying heights

The soft glow of candlelight can transform any room into a cozy and welcoming environment, yet it sometimes comes with an undesirable consequence – the deposition of soot on the walls. Tackling this stubborn stain might appear overwhelming, but worry not, as I have found a simple and efficient way to remove candle soot from your walls.

With a few simple steps, you can restore your walls to their pristine condition.

Firstly, gather the necessary supplies, including a dry cloth, a vacuum cleaner, and a cleaning solution.

Before diving into the cleaning process, it is essential to test a small area to ensure that your chosen methods do not damage the wall’s surface. Once you have confirmed its safety, use a dry cloth to gently remove any loose soot.

Next, vacuum the walls to eliminate any remaining particles.

To tackle the stubborn stains, create a cleaning solution using gentle ingredients. With this solution, gently scrub the affected areas using a cloth or sponge. Afterward, rinse the walls with clean water to remove any residue.

Lastly, ensure the walls are thoroughly dry before admiring your spotless and soot-free space. Remember, if necessary, repeat the process until the soot is completely eliminated.

Let’s get started on banishing that pesky candle soot for good!

Key Takeaways

  • Gather necessary supplies: dry cloth, vacuum cleaner, cleaning solution.
  • Test a small area before cleaning.
  • Use dry cloth to remove loose soot.
  • Vacuum walls to remove remaining particles.

Gather the Necessary Supplies

Before diving into the task of removing candle soot from walls, make sure you’ve gathered all the necessary supplies. Cleaning techniques for removing soot from walls are fairly straightforward, but having the right supplies will make the job much easier.

You will need a few basic items: a vacuum cleaner with a brush attachment, a bucket filled with warm water, a mild detergent, a sponge or soft cloth, and a clean towel.

Start by using the vacuum cleaner with the brush attachment to gently remove any loose soot particles from the wall. This will prevent smudging and spreading the soot further.

Next, mix a small amount of mild detergent with warm water in the bucket. Dip the sponge or soft cloth into the soapy water, wring out any excess, and gently scrub the affected area in a circular motion. Be careful not to apply too much pressure, as this can damage the wall.

After cleaning, use a clean towel to dry the wall thoroughly. This will prevent streaks and water damage. Additionally, consider using a soot-resistant paint or wallpaper to prevent future soot buildup.

By taking these steps and gathering the necessary supplies, you’ll be well-prepared to tackle the task of removing candle soot from your walls. Now, let’s move on to the next section and learn how to test a small area before proceeding with the cleaning process.

Test a Small Area

Firstly, it’s essential to evaluate a small area to ensure the cleaning process doesn’t cause any unintended consequences. Testing methods can help identify any potential risks before proceeding with the removal of candle soot from walls. Here are four important steps to consider during this evaluation:

  1. Select an inconspicuous spot: Choose a small, hidden area of the wall to conduct the test. This will minimize any visible damage in case the cleaning method isn’t suitable.

  2. Apply the cleaning solution: Use a small amount of the chosen cleaning solution on a clean cloth or sponge. Gently rub the solution on the test area, ensuring it doesn’t spread beyond the designated spot.

  3. Observe any changes: Allow the cleaning solution to sit on the test area for a few minutes. Look for any adverse reactions, such as discoloration, paint damage, or texture alteration.

  4. Evaluate the results: After the test area has dried, assess whether the cleaning solution effectively removes the soot without causing any damage. If the results are satisfactory, you can proceed to clean the rest of the affected walls using the same method.

Once the test area has been assessed and found to be safe, it’s time to move on to the next step. Use a dry cloth to remove loose soot and prepare the walls for further cleaning.

Use a Dry Cloth to Remove Loose Soot

Next, grab a dry cloth to gently wipe away the fine black residue left behind by the burning candles, revealing the true beauty of your walls. Did you know that on average, a single candle releases over 10 grams of soot into the air? Using a dry cloth is an effective and simple way to remove loose soot from your walls.

The dry cloth acts as a magnet, attracting the soot particles and trapping them within its fibers. This method is particularly beneficial because it doesn’t require any additional cleaning products and is safe for most wall surfaces.

Using a dry cloth also has its advantages over alternative methods. Unlike wet cleaning methods, which may leave behind streaks or smudges, a dry cloth leaves your walls looking clean and spotless. Additionally, using a dry cloth is a quick and convenient way to remove soot without needing to mix cleaning solutions or wait for surfaces to dry.

Once you have wiped away the loose soot with a dry cloth, it’s time to move on to the next step: vacuuming the walls. This method will help remove any remaining soot particles that may be embedded in the wall’s texture or hard-to-reach areas.

Vacuum the Walls

Now it’s time to give your walls a thorough cleaning by using a vacuum. Vacuuming is an effective technique to remove candle soot from walls, as it helps to suck up loose particles and prevent them from spreading further.

Here are three vacuuming techniques you can use to efficiently clean your walls:

  • Start from the top: Begin vacuuming from the ceiling and work your way down to the floor. This helps to prevent any soot from falling onto already cleaned areas.

  • Use a soft brush attachment: Attach a soft brush to your vacuum cleaner to gently brush away any stubborn soot particles. Make sure the brush is clean and free from any debris before starting.

  • Don’t forget the corners: Pay special attention to the corners of the walls, as soot tends to accumulate there. Use the crevice tool attachment on your vacuum cleaner to reach into the corners and remove any lingering soot.

By following these vacuuming techniques, you can effectively remove candle soot from your walls and prevent it from causing further damage. Once you’ve finished vacuuming, it’s time to move on to the next step: creating a cleaning solution to further clean and restore your walls.

Create a Cleaning Solution

To effectively clean and restore your walls, it’s time to mix up a powerful cleaning solution. When dealing with candle soot, it’s important to wear gloves to protect your hands from the residue and any potentially harmful chemicals in the cleaning solution. Additionally, wearing gloves can prevent the soot from transferring onto your skin, which can be difficult to remove.

To create a cleaning solution, you’ll need a few simple ingredients. Start by filling a bucket with warm water and add a small amount of mild dish soap. The warm water helps to dissolve the soot, while the dish soap helps to break down the greasy residue. Mix the solution until the soap is well-distributed in the water.

By wearing gloves, you not only protect your hands but also ensure that the cleaning process is more effective. Furthermore, taking precautionary measures such as using gloves can prevent candle soot from staining your walls in the future.

Now that you have your cleaning solution ready, it’s time to move on to the next step: applying the cleaning solution to the stains.

Apply the Cleaning Solution to the Stains

Once you’ve got your powerful cleaning solution mixed up, it’s time to apply it to those stubborn stains and watch them disappear before your eyes.

To ensure proper application of the cleaning solution, start by dipping a clean sponge or cloth into the solution. Make sure the sponge or cloth is damp, not dripping wet. Gently press the sponge or cloth against the soot stains on the walls and begin to rub in a circular motion. Be careful not to scrub too hard, as this can damage the paint or wallpaper.

As you apply the cleaning solution, you’ll notice the stains starting to fade away. Work on one section at a time, applying more solution as needed. If the stains are particularly stubborn, you may need to let the cleaning solution sit on the walls for a few minutes before gently scrubbing them. This will help loosen the soot and make it easier to remove.

Once you’re finished applying the cleaning solution and the stains have been removed, it’s time to move on to the next step: gently scrubbing the stains.

Gently Scrub the Stains

After the cleaning solution has been applied, delicately scrubbing the stains will help ensure a thorough and effective cleaning process. To effectively remove candle soot from walls, it’s important to use the right scrubbing technique. Start by dampening a soft cloth or sponge with the cleaning solution. Use gentle circular motions and apply light pressure while scrubbing the stained areas. This technique will help break down and lift the stubborn stains off the walls.

When scrubbing, it’s crucial to be mindful of the wall’s surface. Avoid scrubbing too vigorously as it may damage the paint or wallpaper. Instead, focus on applying consistent and even pressure. If the stains persist, you can try using a slightly firmer touch, but always remember to be cautious.

As you scrub, periodically rinse the cloth or sponge in clean water to remove any accumulated soot. This will prevent the transfer of dirt back onto the walls. By incorporating this rinsing step, you ensure that the cleaning process remains effective throughout.

With a careful scrubbing technique, you can effectively remove candle soot stains from your walls. Once you’ve thoroughly scrubbed the stains, it’s time to move on to the next step – rinsing the walls with clean water.

Rinse the Walls with Clean Water

To ensure a sparkling finish, I gently rinse my walls with clean water. When it comes to removing candle soot stains, the rinse technique is crucial to get rid of any remaining residue.

I start by filling a bucket with warm water, making sure the temperature isn’t too hot or cold. Using a sponge or a soft cloth, I dip it into the water and wring it out to remove any excess moisture. Then, I gently wipe the walls in a circular motion, focusing on the areas with soot stains. It’s important to avoid applying too much pressure, as it can damage the paint or wallpaper.

As I rinse the walls, I periodically rinse the sponge or cloth in the bucket to prevent spreading the soot around. Once I have thoroughly rinsed the walls, I transition to the next step of drying them thoroughly.

Dry the Walls Thoroughly

Make sure to completely dry the walls to achieve a beautiful, spotless finish. After rinsing the walls with clean water, it’s essential to thoroughly dry them. This step is crucial in preventing any remaining candle soot from staining the walls and ceilings.

To start, use a clean, dry cloth or towel to gently wipe away any excess moisture. Next, open windows or use fans to encourage air circulation and speed up the drying process. It’s also helpful to keep the room well-ventilated to prevent any mold or mildew growth. If necessary, use a dehumidifier to remove excess moisture from the air.

Additionally, avoid applying any paint or other wall treatments until the walls are completely dry to ensure a smooth and even finish. Remember, drying the walls thoroughly is an important step in achieving the best results.

Once the walls are dry, you can move on to the next step of the process, which is repeating the process if necessary to fully remove any stubborn candle soot stains.

Repeat the Process if Necessary

If needed, continue the procedure again to ensure that any persistent residue is completely eliminated. Sometimes, the initial cleaning may not completely remove all the candle soot from the walls, especially if it has been there for a long time or if the walls are textured. In such cases, repeating the process can be an effective way to get rid of the remaining residue.

To repeat the process, start by gathering the necessary cleaning supplies, such as a vacuum cleaner with a brush attachment, a soft cloth or sponge, and a mild cleaning solution. Begin by vacuuming the walls to remove any loose soot particles. Next, dampen the cloth or sponge with the cleaning solution and gently scrub the affected areas, working in small sections at a time. Remember to always test the cleaning solution on a small, inconspicuous area of the wall first to ensure it doesn’t cause any damage.

If the residue persists after repeating the cleaning process, there are a few other effective methods you can try. One option is to use a mixture of vinegar and water, which can help break down the soot and make it easier to remove. Another method is to use a specialized soot sponge, which is designed specifically for removing soot from surfaces. Simply wet the sponge and gently wipe it over the affected areas, using a light pressure.

Incorporating a table can help emphasize certain points or ideas. Here is an example of a 2 column and 4 row table that outlines the steps for repeating the cleaning process:

Step Description
Step 1 Gather necessary cleaning supplies.
Step 2 Vacuum the walls to remove loose soot particles.
Step 3 Dampen a cloth or sponge with cleaning solution.
Step 4 Gently scrub the affected areas in small sections.

By following these steps and utilizing effective methods, you can ensure that any persistent residue is completely eliminated from your walls.

Frequently Asked Questions

Can I use a regular household cleaner to remove candle soot from walls?

Yes, a regular household cleaner can be used to remove candle soot from walls. However, there are also alternative household cleaner options available specifically formulated for removing soot from different surfaces. These cleaners are designed to effectively break down and remove soot without damaging the walls.

When using a household cleaner, it’s important to follow the instructions on the label and test it on a small, inconspicuous area first to ensure compatibility with your walls.

What should I do if the cleaning solution doesn’t remove all of the stains?

If the cleaning solution doesn’t fully remove the stains, there are alternative cleaning methods you can try. One option is to mix baking soda with water to create a paste, then gently scrub the stained areas.

Alternatively, you may consider hiring professional cleaning services that specialize in removing stubborn stains. They have the expertise and tools to effectively tackle the problem.

Remember to test any cleaning method on a small, inconspicuous area before applying it to the entire wall.

Can I use a scrub brush or sponge to remove the soot, or will that damage the walls?

You can use a scrub brush or sponge to remove the soot from walls, but be careful not to damage the surface. If you’re worried about potential damage, there are alternatives to consider.

One option is using a cleaning solution specifically designed for removing soot stains. Another method is using a dry sponge or cloth to gently wipe away the soot. Always test any cleaning method on a small, inconspicuous area first to ensure it doesn’t cause any damage.

Is it necessary to rinse the walls with clean water after applying the cleaning solution?

Is rinsing the walls with clean water necessary after applying the cleaning solution, or can the solution be left on the walls?

It’s highly recommended to rinse the walls with clean water after applying the cleaning solution. This will ensure that all residue from the solution is removed, leaving the walls clean and free from any potential damage.

Instead of using a scrub brush or sponge, it’s best to use a soft cloth or a microfiber cloth to gently remove the soot without causing any harm to the walls.

How long should I let the walls dry before repeating the cleaning process?

I wouldn’t rush into applying a second coat of paint too soon. Remember, patience is key when it comes to achieving a flawless finish. Give the walls ample time to dry completely before considering another round of cleaning.

As for speeding up the process, using a hairdryer can be helpful, but be cautious not to overheat the walls. Remember, a steady and even drying process is crucial for optimal results.

Conclusion

In conclusion, removing candle soot from walls is a simple and effective process. By gathering the necessary supplies and following the steps outlined, you can easily get rid of those stubborn stains.

Remember to test a small area first and use a dry cloth to remove loose soot before vacuuming the walls.

Create a cleaning solution and gently scrub the stains to ensure a thorough cleaning.

Rinse the walls with clean water and dry them thoroughly for best results.

If needed, repeat the process.

So, don’t let candle soot leave you in the dark, tackle it head-on using these easy steps and soon your walls will be as clean as a whistle.

Continue Reading

Beginners Guides

How To Remove Candle Wax From Hardwood Floor

Published

on

By

An image showcasing a hardwood floor with a spilled candle, depicting the step-by-step process of removing the wax

Have you ever been annoyed by accidentally dripping candle wax onto your lovely wooden floor? Fear not, I have a solution for you.

In this article, I will guide you through a simple yet effective technique to remove candle wax from your hardwood floors. Imagine a pristine wooden surface free from any sticky residue, as if the accident never happened.

So, how can we achieve this? By following a few easy steps and using some common household items, you’ll be able to restore your hardwood floor to its former glory in no time. With a little patience and the right approach, removing candle wax becomes a straightforward task that anyone can tackle.

In this guide, I will walk you through each step, from assessing the damage and gathering supplies to applying heat and scrubbing gently with a soft cloth or sponge. We’ll also discuss how to clean and polish the floor afterward and even share tips on preventing future wax stains.

Get ready to say goodbye to that pesky candle wax and hello to a spotless hardwood floor! Let’s dive in!

Key Takeaways

  • Assess the damage before choosing a cleaning method
  • Gather necessary supplies for wax removal
  • Use ice pack to freeze wax before scraping
  • Apply heat to soften wax for easier removal (hairdryer or iron)

Assess the Damage

Now, take a moment to assess the damage you’re dealing with on your hardwood floor. Evaluating the severity of the wax spill is crucial in determining the appropriate cleaning method. Start by examining the affected area closely and identifying any visible signs of damage. Is there discoloration or staining? Are there scratches or gouges caused by attempts to remove the wax? Understanding the extent of the problem will help you choose an effective solution.

Once you’ve evaluated the severity, it’s time to select the appropriate cleaning method for your hardwood floor. The technique may vary depending on factors such as the type of wood and finish. For minor spills or thin layers of wax, a simple scraping method can be used. Gently scrape off as much wax as possible using a plastic scraper or credit card, being careful not to scratch the floor.

If there is a thicker layer of hardened wax, try using heat to soften it before removal. Place a clean cloth over the affected area and apply low heat using an iron set on its lowest setting. This will melt the wax, allowing it to transfer onto the cloth easily.

Now that you have assessed and chosen your cleaning method, let’s move on to gathering your supplies for removing candle wax from your hardwood floor without causing further damage.

Gather Your Supplies

First, make sure you have all the necessary items on hand, like a credit card or plastic spatula for scraping and an ice pack to freeze the wax. These supplies are essential for effectively removing candle wax from hardwood floors. Preventive measures can save you from future headaches. Place a mat or tray under your candles to catch any dripping wax and avoid direct contact with the floor. If a spill does occur, act quickly to prevent the wax from seeping into the wood grain.

Now that you’ve gathered your supplies, it’s time to tackle the removal process. Start by using the ice pack to freeze the wax. This will harden it and make it easier to remove without causing any damage to your floor. Simply place the ice pack on top of the wax and let it sit for a few minutes until it becomes firm.

Once the wax is frozen, take your credit card or plastic spatula and gently scrape off excess wax. Be careful not to scratch or gouge the surface of your hardwood floor as you do this.

Transitioning into the next step, focus on removing any residue left behind by following alternative cleaning methods that are safe for hardwood floors.

Continue onto the subsequent section about ‘scrape off excess wax’ without writing ‘step’.

Scrape off Excess Wax

To tackle the excess wax on your hardwood floor, gently slide a credit card or plastic spatula along the surface, carefully scraping away any leftover residue. This method is effective because it allows you to remove the wax without damaging the wood. As you scrape off the excess wax, be sure to work in small sections and apply gentle pressure to avoid causing any scratches.

As you begin removing candle wax from your hardwood floor, it’s important to gather all of your supplies beforehand. Having everything ready will make the process smoother and more efficient. Here is a helpful table that lists the supplies you will need:

Supplies
Credit card or plastic spatula
Clean cloth or paper towels
Floor cleaner or rubbing alcohol

By having these items readily available, you can easily tackle any candle wax spills on your hardwood floor.

Next, we will discuss how to apply heat to the remaining wax. This step is crucial in completely removing any traces of wax from your floor and ensuring its cleanliness and longevity.

Apply Heat to the Wax

Once you’ve got your supplies ready, it’s time to bring out the heat and melt away that pesky wax on your beautiful wooden floors! To remove wax from a hardwood floor, applying heat is an effective method. The heat helps to soften the wax, making it easier to remove.

There are a few ways you can apply heat to the wax. One option is to use a hairdryer on its highest setting. Hold the dryer about six inches away from the wax and move it back and forth over the affected area. As the wax heats up, it’ll start to soften and become more pliable. Be careful not to hold the dryer too close or for too long as this could damage your floor.

Another option is to use an iron with a clean cloth or paper towel between it and the wax. Set the iron on low heat and gently press it onto the cloth or paper towel in short intervals. The heat’ll transfer through the cloth or towel and melt the wax beneath.

Once you’ve applied heat, you can proceed to blotting with a paper towel or cloth… [transition sentence]

Blot with a Paper Towel or Cloth

After applying heat and melting the wax, it’s time to gently blot away any remnants with a paper towel or cloth. This step is crucial in assessing the damage caused by the wax and preventing further harm to your hardwood floor. When blotting, be sure to use a soft cloth or paper towel to avoid scratching the surface of the wood.

Start by placing the paper towel or cloth over the melted wax and apply gentle pressure. The heat from earlier will have softened the wax, making it easier to absorb. As you blot, you may notice that some of the color from the candle has transferred onto your cloth or paper towel. Don’t worry; this is normal.

Continue blotting until no more wax transfers onto your chosen material. If there are still stubborn traces of wax left behind, try using a clean section of your cloth or paper towel and repeating the process.

Once you’ve successfully removed all visible traces of wax, it’s time to move on to using a solvent or cleaning agent for any remaining residue. But before we discuss that step, let’s tackle how to prevent further damage during this process.

Use a Solvent or Cleaning Agent

When it comes to rescuing your precious hardwood floor from the clutches of a stubborn invader, unleash the power of a mighty solvent or cleaning agent. These potent solutions are designed to dissolve and remove candle wax without causing damage to your delicate hardwood surface.

Here are some solvent options and alternative cleaning methods that you can consider:

  • Rubbing Alcohol: Dampen a cloth with rubbing alcohol and gently dab at the wax residue until it softens. Then, wipe away the softened wax with a clean cloth.

  • Vinegar Solution: Create a mixture of equal parts white vinegar and water. Apply this solution to the affected area and let it sit for a few minutes. Use a soft cloth or sponge to wipe away the wax.

  • Ice Cube Method: Place an ice cube in a plastic bag and apply it directly onto the wax until it hardens. Once hardened, carefully scrape off the wax using a plastic scraper.

These solvents offer effective ways to tackle stubborn candle wax stains on your hardwood floor. After removing as much wax as possible, you can then proceed to scrub gently with a soft cloth or sponge to ensure that all traces of residue are eliminated without causing any harm to your beloved flooring.

Scrub Gently with a Soft Cloth or Sponge

Gently scrubbing with a soft cloth or sponge is an effective method for removing candle wax from hardwood floors. This technique helps restore the natural beauty of your cherished flooring without causing any damage.

When choosing between a soft cloth and a sponge, both options have their pros and cons. Using a soft cloth is ideal because it’s gentle on the surface of the floor. It allows you to apply just the right amount of pressure needed to remove the wax without scratching or damaging the wood. However, it may require more effort and time to completely remove stubborn wax stains.

On the other hand, using a sponge can be more efficient in removing larger amounts of wax quickly. The porous texture of the sponge absorbs the melted wax effectively, making it easier to clean up. However, you need to be careful not to press too hard on the floor, as this could leave marks or scratches.

Remember, after gently scrubbing with a soft cloth or sponge, check if all traces of wax are removed. If necessary, repeat this process until your hardwood floor looks pristine once again.

Repeat the Process if Necessary

After scrubbing gently with a soft cloth or sponge, you may find that there’s still some candle wax residue left on your hardwood floor. Don’t worry, because this is where the power of repetition comes into play. By repeating the process of removing candle wax, you can ensure that every last bit is eliminated from your beautiful flooring.

There are several effective methods for repeating the process. One option is to use an ice pack or ice cubes wrapped in a cloth and apply it to the remaining wax until it hardens. Once hardened, carefully scrape off the wax using a plastic scraper or credit card.

Another method involves using a hairdryer set on low heat to soften the wax and then wiping it away with a clean cloth.

Remember, patience is key when repeating this process. It may take several attempts before all traces of candle wax are completely removed. But don’t worry, each repetition brings you one step closer to achieving a spotless hardwood floor.

Now that we’ve successfully removed all candle wax from your hardwood floor, it’s time to move on to the next step: cleaning and polishing the floor.

Clean and Polish the Floor

Now it’s time for you to give your beautiful flooring a thorough clean and polish. Maintaining your hardwood floor is essential to keep it looking its best for years to come. Regular floor maintenance not only removes dirt and grime but also helps preserve the natural beauty of the wood. When it comes to cleaning candle wax from hardwood, there are natural cleaning methods that can effectively remove the residue without causing any damage.

To clean and polish your floor, follow these simple steps:

Step Instructions
Step 1 Scrape off excess wax with a plastic scraper or credit card.
Step 2 Place a brown paper bag over the wax stain.
Step 3 Apply gentle heat using a hairdryer on low setting.
Step 4 Press down with an iron on top of the paper bag for a few seconds, allowing the wax to transfer onto the bag.

Once you have successfully removed all traces of candle wax, it’s important to give your floor a good clean and polish. This will not only restore shine but also act as a protective layer against future stains and spills.

To prevent future wax stains, consider using candle holders or trays under candles to catch any dripping wax. Additionally, regular dusting and sweeping will help minimize buildup on your hardwood floors.

Transitioning into preventing future wax stains, let’s explore some useful tips for maintaining an immaculate floor surface without compromising its charm.

Prevent Future Wax Stains

To keep your beautiful flooring looking flawless, avoid future stains by taking preventative measures. Wax prevention is an essential part of hardwood floor maintenance. One effective way to prevent future wax stains is to use a doormat at all entryways. This will help remove any dirt or debris from the shoes before stepping onto the hardwood floor, reducing the chances of transferring wax onto it.

Additionally, placing protective pads on the bottom of furniture legs can prevent scratches and scuffs that may require waxing and potentially lead to stains.

Regular cleaning is also crucial in preventing wax stains. By sweeping or vacuuming the floor regularly, you can remove any loose particles that could become embedded in the wax and cause staining over time. Be cautious when using cleaning products as some may contain ingredients that can damage the hardwood surface or leave residues that attract dust and dirt.

Furthermore, try to avoid placing candles directly on hardwood surfaces. Instead, opt for candle holders or trays to catch any dripping wax. If you enjoy burning candles frequently, consider using flameless LED candles as they eliminate the risk of hot wax spilling onto your floors altogether.

By following these preventive measures, you can maintain your hardwood floors’ pristine appearance and minimize the need for removing unwanted candle wax stains in the future.

Frequently Asked Questions

Can I use a hairdryer to apply heat to the wax?

Using a hairdryer on a hardwood floor to apply heat directly to wax isn’t recommended. The high heat from the hairdryer can damage the wood or even cause it to warp. It’s best to avoid using direct heat altogether when removing candle wax from hardwood floors.

Instead, try using a plastic scraper or credit card to gently scrape off the hardened wax. If there are any residual stains, you can use a cloth soaked in rubbing alcohol to remove them effectively without causing any damage.

What type of solvent or cleaning agent should I use?

For removing candle wax from hardwood floors, I recommend using a solvent or cleaning agent specifically designed for this purpose. There are several alternatives available in the market that work effectively. However, using heat to remove the wax is also an option. Heat can help soften the wax, making it easier to remove. Just be cautious not to overheat the floor.

Can I use a hard bristle brush to scrub off the wax?

Yes, using a hard bristle brush can be an effective way to remove candle wax from hardwood floors. However, it’s important to proceed with caution as the brush could potentially scratch or damage the surface of the wood. To minimize this risk, consider using alternative methods such as placing a brown paper bag or cloth over the wax and gently applying heat with an iron. This will help melt the wax, making it easier to remove without causing any harm to your hardwood floors.

Is it safe to use vinegar as a cleaning agent on hardwood floors?

Oh, vinegar, the magical elixir that can do it all. But is it safe to use on hardwood floors? Let’s pit vinegar against commercial hardwood floor cleaners and see which one reigns supreme. While vinegar may be a budget-friendly option, it does come with its risks and drawbacks.

The acidic nature of vinegar can potentially damage the finish of your hardwood floors over time. So, proceed with caution and consider other alternatives before dousing your precious flooring in this tangy solution.

How long should I let the solvent or cleaning agent sit on the wax before scrubbing?

I would recommend letting the solvent or cleaning agent sit on the wax for about 5-10 minutes before wiping it off. This will give the solvent enough time to penetrate and soften the wax, making it easier to remove.

If you prefer a gentler approach, you can use a soft cloth instead of scrubbing with a brush. Gently wipe away the softened wax in a circular motion until it is completely removed from the hardwood floor.

Conclusion

Well folks, we’ve reached the end of our little journey on how to remove candle wax from hardwood floors. Hopefully, armed with the knowledge and tips I’ve shared, you’ll be able to tackle any wax-related mishaps that come your way.

Remember, it’s all about assessing the damage, gathering your supplies, and applying some heat (not too much though, we don’t want a fire hazard!). Just remember to scrub gently and repeat the process if needed.

And hey, while you’re at it, why not clean and polish those floors to make them shine like never before?

Now go forth and conquer those pesky wax stains!

Continue Reading

Trending