
Have you ever found yourself in a sticky situation with candle wax all over your walls? Don’t worry, I’m here to help! I will share my foolproof method to easily remove that wax from your walls. With just a few simple tools, you’ll be able to make those stubborn stains vanish in no time.
First, we’ll gather the necessary supplies to tackle this task head-on. Then, we’ll scrape off any excess wax using a handy tool.
Next, we’ll use the power of heat from a hairdryer to melt the remaining wax away. Once melted, we’ll blot it up with paper towels and apply a cleaning solution to remove any residue. After rinsing the area with water and drying it thoroughly, we can assess our results.
If there are still traces of wax left behind, don’t fret! We can repeat the process until every last bit is gone.
Finally, I’ll share some tips on how to prevent future wax stains from occurring.
So let’s roll up our sleeves and get ready to say goodbye to those pesky candle wax marks on your walls once and for all!
Key Takeaways
- Gather necessary supplies: plastic scraper, paper towels or cloths, rubbing alcohol or vinegar solution.
- Test cleaning solution on inconspicuous area before use.
- Use hairdryer on low heat to soften remaining wax on wall.
- Apply cleaning solution and gently scrub stain with cloth or sponge.

UDIKEFO Gifts for Dad, Fathers Day Christmas Birthday Dad Gifts from Daughter Son - Sandalwood Scented Candle
FUNNY GIFTS FOR DAD- This sandalwood candle with a humorous saying: Dad, Please Light This Candle.It is a...
As an affiliate, we earn on qualifying purchases.
Gather the Necessary Supplies
Now you’re ready to gather all the supplies you need to tackle that stubborn candle wax on your wall.
First and foremost, you’ll need a plastic scraper or a credit card to gently scrape off excess wax without damaging the paint or wallpaper.
Next, grab some paper towels or clean white cloths to blot away any melted wax residue. If you don’t have either of these, a brown paper bag can also do the trick.
In addition to these basic tools, it’s helpful to have some rubbing alcohol or isopropyl alcohol on hand. These liquids are excellent for dissolving and removing wax stains from walls. Alternatively, if you prefer natural cleaning methods, vinegar mixed with warm water can be just as effective.
Remember to always test an inconspicuous area of your wall before using any cleaning solution or method. This will ensure that the product doesn’t cause any damage or discoloration.
Now that you know what supplies you need for this task, let’s move on to the next step: scraping off excess wax residue from your wall.

Homsolver Dad Gifts from Daughter Son, Gift for Dad Who Wants Nothing, Birthday Fathers Day Christmas for Stepdad Adoptive Father, Dad's Last Nerve Sandalwood Scented Candle
Dad's Gifts from Daughter: This black cedarwood juniper and sandalwood candle with a humorous saying "Dad's last nerve...
As an affiliate, we earn on qualifying purchases.
Scrape off Excess Wax
First, grab a plastic card from your wallet and gently slide it under the wax on the wall, effortlessly removing the excess residue. This technique works well because it prevents any scratching or damage to the wall surface.
Here are some additional tips to help you remove candle wax effectively:
-
How to remove melted candle wax from clothing: Place a brown paper bag over the wax stain and run a warm iron over it. The heat will melt the wax, allowing it to transfer onto the paper bag. Repeat this process until all of the wax is removed.
-
How to remove candle wax from carpet: Start by placing ice cubes in a resealable plastic bag and apply it directly on top of the wax. Wait for about 10 minutes until the wax hardens, then use a butter knife or spoon to scrape off as much as possible. Finish by using an iron and paper towels to lift any remaining residue.
By following these simple steps, you can easily get rid of unwanted candle wax stains from various surfaces.
Now let’s move on to using a hairdryer to heat the remaining stubborn wax before removing it completely.
Homsolver Gift for Dad, Fathers Day Christmas Birthday Dad Gifts from Daughter Son - Sandalwood Scented Candle (7OZ)
FUNNY GIFTS FOR DAD- This black cedarwood juniper & sandalwood candle with a humorous saying: Dad, Please Light...
As an affiliate, we earn on qualifying purchases.
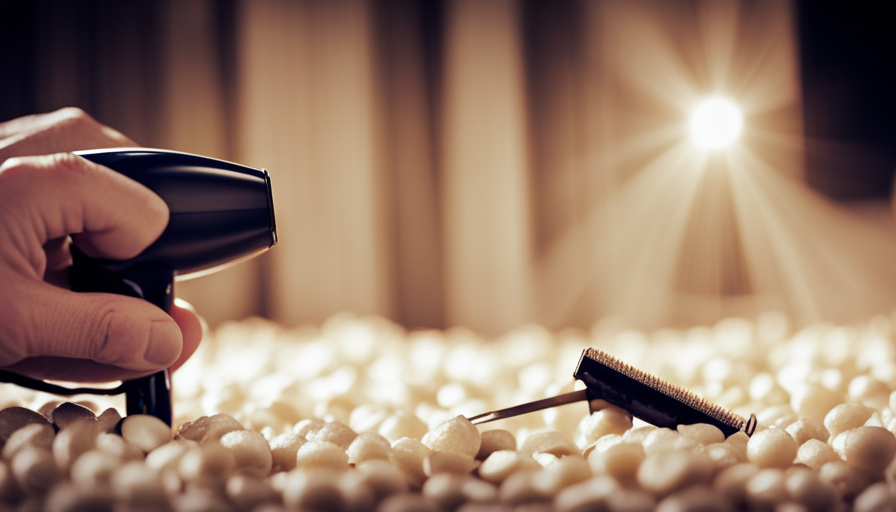
Use a Hairdryer to Heat the Wax
To easily remove the stubborn wax from your wall, why not try using a hairdryer to heat it up? This method is one of the alternative methods for removing candle wax from walls. It’s simple and effective.
First, plug in your hairdryer and set it on low heat. Hold the hairdryer about six inches away from the wax stain on your wall. Move it back and forth over the area, allowing the warm air to melt the wax. As you do this, be careful not to get too close to avoid damaging the paint or wallpaper.
The heated wax will start to soften and become more pliable, making it easier to remove. Gently scrape off as much of the softened wax as possible with a plastic scraper or an old credit card.
However, there are some common mistakes you should avoid when using a hairdryer. Don’t use high heat settings as they can cause discoloration or even scorching on your wall surface. Also, make sure not to apply excessive force when scraping off the melted wax as it may damage your wall.
Once you’ve finished heating and scraping off most of the wax residue, proceed to blotting the melted wax with paper towels as discussed in the subsequent section.

Scented Candles Set | Men Candle Set, Scented Candles for Home, Gifts for Men Aromatherapy Gift Set - 4 Pack Manly Gifts for Dad Fathers Day, Soy Candle of Leather/Smoke & Vanilla/Oak/Lavender
Gifts for Him: Scented candles tailored for men make wonderful gifts for Fathers Day, birthdays, holidays, or special...
As an affiliate, we earn on qualifying purchases.
Blot the Melted Wax with Paper Towels
After heating and scraping off most of the softened wax, I proceed to blot the melted residue with paper towels. Blotting is an effective technique to absorb the remaining wax from the wall surface.
Here are some alternative cleaning solutions and paper towel alternatives that you can use:
-
Vinegar Solution: Mix equal parts of white vinegar and water in a spray bottle. Spray it onto a clean cloth or sponge, then gently blot the wax until it’s fully removed.
-
Rubbing Alcohol: Dampen a cloth with rubbing alcohol and dab it on the wax stain. Blot the area until all the residue is lifted.
-
Dish Soap Solution: Create a solution by mixing a few drops of dish soap with warm water. Dip a cloth or sponge into this mixture, then carefully blot away the melted wax.
-
Baking Soda Paste: Make a paste using baking soda and water. Apply this paste to a cloth and gently rub it over the leftover wax, then wipe clean.
Blotting allows for quick removal without damaging your walls. Once you’ve successfully removed all visible wax residue, now we can move on to applying a cleaning solution for any remaining stains on your wall surface.
Apply a Cleaning Solution
Now is the time to tackle those stubborn stains and restore your wall to its pristine condition with a powerful cleaning solution.
When it comes to removing candle wax from fabric, there are several cleaning solution alternatives that can effectively get the job done. One option is using rubbing alcohol or isopropyl alcohol. Simply dampen a clean cloth with the alcohol and gently dab at the wax stain until it lifts off the wall.
Another alternative is using a mixture of dish soap and warm water. Create a soapy solution by mixing a few drops of dish soap with warm water in a bowl. Then, dip a cloth into the solution and blot at the wax stain until it disappears.
If you prefer natural remedies, vinegar can also be an effective cleaning solution for removing candle wax from walls. Mix equal parts white vinegar and water in a spray bottle, then spray directly onto the stain. Let it sit for a few minutes before wiping away with a clean cloth.
Now that you’ve applied the cleaning solution, it’s time to move on to gently scrubbing the stain without damaging your wall’s surface.
Gently Scrub the Stain
Carefully and delicately scrub away the stubborn stain, restoring your wall to its original beauty. When removing candle wax from a wall, it’s important to use gentle cleaning techniques to avoid damaging the surface. Begin by preparing an alternative cleaning solution using common household ingredients. Mix equal parts of white vinegar and warm water in a spray bottle. This solution is effective in breaking down the wax without causing any harm to the paint or wallpaper.
To further enhance the effectiveness of the cleaning solution, you can incorporate additional ingredients such as dish soap or baking soda. These substances help to loosen the wax and dissolve any residue left behind. Apply the cleaning solution onto a clean cloth or sponge and gently scrub the stained area using circular motions.
| [table] | Cleaning Solution Ingredients | Proportion |
|---|---|---|
| White vinegar | Equal parts | |
| Warm water | Equal parts |
By applying these gentle cleaning techniques, you can ensure that your wall remains intact while effectively removing the candle wax stain. Once you have finished scrubbing, transition into rinsing the area with water to eliminate any remaining residue and complete this step of your wall restoration process.
Rinse the Area with Water
Once you’ve finished gently scrubbing the stain away, give your wall a refreshing shower by rinsing the area with water. Here are some discussion ideas to consider when tackling this step:
-
Effectiveness of different cleaning solutions for removing candle wax from walls:
- Is using warm soapy water more effective than plain water?
- Does adding vinegar or baking soda enhance the cleaning power?
-
Tips for preventing water damage while rinsing candle wax off walls:
- Use a spray bottle to control the amount of water applied.
- Cover nearby furniture or electrical outlets with plastic wrap.
- Avoid excessive soaking by using a damp cloth instead.
By incorporating these discussion ideas into your cleaning process, you can make informed decisions and achieve better results.
Once you have thoroughly rinsed the area, it’s time to move on and dry the wall to assess your progress.
Dry and Assess the Results
Take a moment to step back and marvel at the spotlessly clean wall you’ve uncovered. After rinsing the area with water, it’s time to dry and assess the results. The water should have loosened the wax, allowing it to be easily wiped away. Grab a clean cloth or paper towel and gently pat the wall dry. As you do so, take note of any remaining wax residue or stains.
To help you assess the effectiveness of your cleaning method, here is a table that compares different outcomes:
| Outcome | Effectiveness |
|---|---|
| Wax-free | Highly effective |
| Minimal residue | Moderately effective |
| Stubborn stains | Ineffective |
By evaluating these outcomes, you can determine if further action is needed or if an alternative cleaning method should be considered. If there are still traces of wax on the wall, you may need to repeat the process using a different approach.
With your newly cleaned wall, it’s time to move on to the next step – repeating the process if necessary – in order to ensure complete removal of any remaining wax residues without causing damage.
Repeat the Process if Necessary
After drying and assessing the results of your initial attempt to remove candle wax from the wall, it’s time to move on to the next step: repeating the process if necessary.
Sometimes, a single attempt may not completely remove all traces of wax, especially if it has deeply penetrated into porous surfaces like paint or wallpaper.
To repeat the process, start by reheating any remaining wax with a hairdryer on low heat. Once softened, gently scrape off as much wax as possible using a plastic card or spatula. Be careful not to damage the wall surface in the process.
If there are still stubborn wax stains left behind, don’t worry! There are alternative methods you can try. One option is to use rubbing alcohol or white vinegar on a clean cloth to dissolve and wipe away the residue. Another method involves placing a brown paper bag over the stain and applying heat with an iron on low setting until the wax transfers onto the paper.
By now, you should have successfully removed most, if not all, of the candle wax from your wall. In our next section about preventing future wax stains…
Prevent Future Wax Stains
To avoid any future wax stains, it’s important to implement preventive measures that will keep your walls pristine and free from any unwanted residue. Here are some simple steps you can take to prevent future wax stains on your walls.
Firstly, consider using protective covers or sheets when lighting candles near walls. This will create a barrier between the candle and the wall, preventing any accidental spills or drips from causing damage.
Another preventive measure is to trim the wick of your candles regularly. When a candle’s wick is too long, it can create larger and hotter flames that may cause more wax to melt and drip onto your walls. By keeping the wicks trimmed to around 1/4 inch, you can reduce the risk of excessive melting and dripping.
Additionally, try using alternative cleaning methods for removing candle wax from surfaces. Instead of scraping or scratching at the wax with sharp objects, which could damage your walls, consider using gentle heat sources like a hairdryer or an iron set on low heat. These methods can help soften the wax without causing harm to your walls.
By implementing these preventive measures and exploring alternative cleaning methods, you can ensure that your walls remain free from any future wax stains while enjoying the warm ambiance of candlelight in your home.
Frequently Asked Questions
How long should the hairdryer be used to heat the wax?
To effectively remove candle wax from a wall, I recommend using a hairdryer on high heat for about 2-3 minutes. It’s important to keep the hairdryer at a safe distance to prevent any damage or discoloration on the wall.
However, if you don’t have a hairdryer, there are alternative heating methods that can be used such as using an iron with a low heat setting or placing a hot towel over the wax and gently rubbing it off.
Can I use any type of cleaning solution?
Using any type of cleaning solution to remove candle wax from a wall can potentially cause damage. It’s important to be cautious when using alternative cleaning methods, as they may not be suitable for all surfaces. Certain cleaning solutions can leave behind residue or discolor the paint on the wall.
To avoid potential damage, it’s recommended to use gentle and non-abrasive methods for removing candle wax from walls.
Should I use warm or cold water to rinse the area?
I recommend using warm water to rinse the area when removing candle wax from walls. Warm water helps to soften the wax, making it easier to remove. The temperature plays a crucial role in effectively eliminating candle wax stains from walls. It aids in breaking down the wax and allows for better penetration of cleaning solutions. By using warm water, you can ensure a more efficient and successful removal process.
How long should I let the area dry before assessing the results?
I like to think of assessing the results after removing candle wax from a wall as waiting for a flower to bloom. It’s important to give the area enough time to dry completely before evaluating how well the wax removal process went. This allows any remaining moisture to evaporate and ensures an accurate assessment of the outcome.
Generally, I would recommend waiting at least 24 hours before carefully inspecting the wall for any remaining residue or damage.
What are some effective ways to prevent future wax stains on the wall?
To prevent future wax stains on the wall and avoid any damage, there are a few effective methods. First, consider using candle holders or trays to catch any drips. You can also place a protective barrier, like aluminum foil or wax paper, behind the candle to shield the wall.
Additionally, trimming the wick regularly can help minimize dripping. Lastly, try using dripless candles that have a harder wax consistency to reduce the chances of staining.
Conclusion
In conclusion, removing candle wax from a wall can be easily accomplished with the right supplies and technique. By following the steps outlined in this article, you can effectively get rid of wax stains and restore your wall’s appearance.
It’s interesting to note that according to a survey conducted by a cleaning products company, over 70% of people have experienced candle wax spills on their walls at least once. This highlights the importance of knowing how to properly remove wax stains to maintain a clean and well-maintained home.