Are your candles plagued by unsightly sinkholes? No need to fret, we have just the solution for you! This helpful guide will walk you through how to repair those annoying sinkholes and restore your candles to their former glory.
Sinkholes can be a real downer, but with a little know-how and some simple steps, you can easily restore your candles to their former beauty. We’ll walk you through everything, from identifying the cause of sinkholes to filling them with melted wax and even preventing them in the future.
So, let’s roll up our sleeves and get ready to serve your candles the TLC they deserve!
Key Takeaways
- Sinkholes in candles can be caused by factors such as excessive wick trimming, poor quality candles, and improper burning techniques.
- Fixing a sinkhole in a candle involves melting and pouring wax to fill the sinkhole seamlessly, using a heat gun to even out the surface, and trimming the wick for optimal burning.
- Regular maintenance of candles is important to prevent sinkholes and improve burn quality, including trimming the wick, testing the candle, and identifying any issues.
- By implementing proactive measures, such as proper wick trimming, avoiding drafty areas, and allowing sufficient burn time, sinkholes in candles can be prevented, leading to longer lifespan and cost-saving, enhanced safety, and maintaining the aesthetic appeal of candles.

CasaCulina Candle Making Pouring Pot, 32oz Stainless Steel Wax Melting Pot with Heat-Resistant Handle, Double Boiler Candle Making Pitcher with Dripless Pouring Spout Design
- Large 32oz Capacity: Holds 900ml for efficient pouring
- Durable Stainless Steel: Rust and corrosion resistant material
- Heat-Resistant Handle: Insulated plastic for safe handling
As an affiliate, we earn on qualifying purchases.
As an affiliate, we earn on qualifying purchases.
Identify the Cause of Sinkholes
- We’ll now discuss the first step in fixing candle sinkholes, which is identifying the cause of these unsightly depressions. It’s important to understand the causes of sinkholes to effectively address the problem.
- Common sinkhole problems include excessive wick trimming, poor quality candles, and improper burning techniques. Excessive wick trimming can lead to an uneven burn, causing sinkholes to form. Poor quality candles may contain additives or impurities that result in uneven melting and depressions. Additionally, improper burning techniques, such as burning candles for short periods or in drafty areas, can contribute to sinkhole formation.
- By identifying these causes, we can take the necessary steps to prevent and fix candle sinkholes, ensuring a more enjoyable and aesthetic candle experience.
Prepare the Necessary Materials
To fix candle sinkholes, we need to gather the necessary materials for the task.

Ensuring candle safety is crucial, so let’s start with a fire extinguisher or a bucket of water nearby, just in case.
Next, we’ll need a heat-resistant container, like a double boiler or a metal pouring pot, to melt the wax.
To level the sinkhole, we’ll need a heat gun or a hairdryer on the lowest setting.
For a smooth finish, have a toothpick or a small metal spatula ready to scrape off any excess wax.
Finally, to prevent future sinkholes, a wick trimmer and a candle snuffer are essential tools.
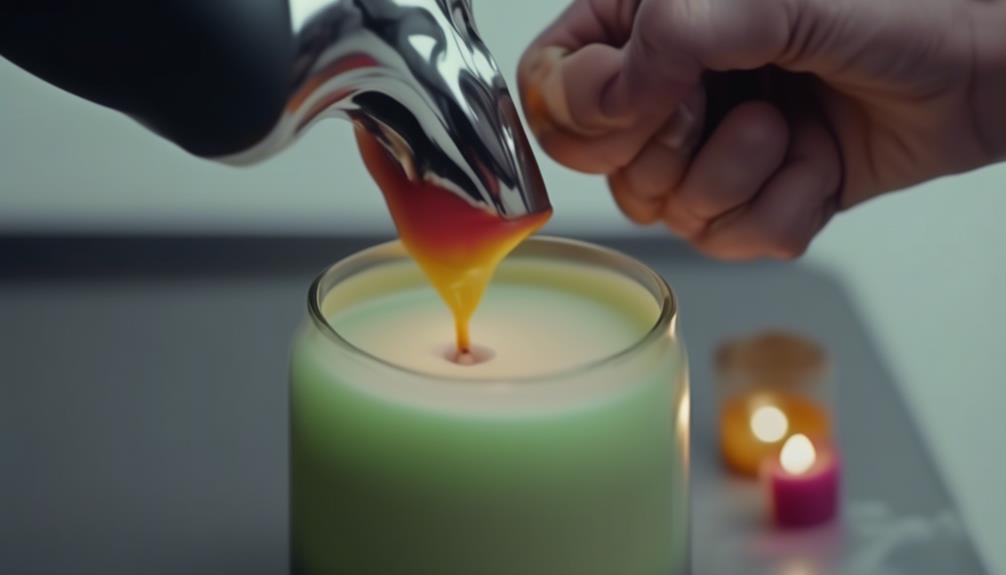
Melt and Pour Wax to Fill the Sinkhole
Now we can move on to filling the sinkhole by melting and pouring wax. Here are three key points to consider when using different wax types and decorative additives:
- Select the right wax type: Depending on the type of candle you have, you may need to use a specific wax type to fill the sinkhole. Beeswax, soy wax, and paraffin wax are commonly used options. Choose a wax that matches the original candle’s composition for the best results.
- Melt the wax: Use a double boiler or a microwave-safe container to melt the wax. Follow the manufacturer’s instructions for melting and heating times. It’s important to melt the wax slowly and evenly to prevent any burning or discoloration.
- Add decorative additives: To match the original candle’s appearance, you can incorporate decorative additives such as color dyes or fragrance oils into the melted wax. Stir them in gently until they’re fully incorporated. This step allows you to customize the fill-in wax to blend seamlessly with the rest of the candle.
Use a Heat Gun to Even Out the Surface
After filling the sinkhole with melted wax, we can now use a heat gun to even out the surface of the candle. This step is crucial in achieving a smooth and polished look.
However, if you don’t have a heat gun, don’t worry. You can use a hairdryer as an alternative. Simply set it to the highest heat setting and hold it about 6 inches away from the candle. Move the hairdryer in a circular motion to evenly distribute the heat. Be sure to keep the hairdryer moving to prevent overheating or melting the wax.

If you don’t have a hairdryer or a heat gun, there are other alternatives to filling sinkholes with wax. You can use a toothpick or a small spoon to carefully scrape off the excess wax and create a more even surface.
Trim the Wick and Test the Candle
Now that we’ve addressed how to even out the surface of a candle, let’s move on to the next step in fixing sinkholes: trimming the wick and testing the candle.
Trimming the wick is important because a long wick can lead to an uneven burn and cause the candle to tunnel. By trimming it to a quarter of an inch, we can ensure a more even and efficient burn.
Additionally, testing the candle by burning it for a couple of hours can help determine if there are any other issues that need to be addressed, such as excessive smoke or uneven melting.

Wick Trimming Importance
To ensure optimal burning and prevent sinkholes, it’s crucial for us to regularly trim the wick and conduct a candle test. Proper wick trimming techniques are essential for maintaining a safe and efficient candle burning experience. Here are three key benefits of regular wick maintenance:
- Improved Burn: Trimming the wick to about 1/4 inch before each use ensures a clean and even burn. It prevents the flame from becoming too large or flickering, which can lead to uneven melting and potential sinkholes.
- Reduced Smoke and Soot: A well-trimmed wick produces less smoke and soot, keeping your candles and surrounding areas clean. It also minimizes the risk of indoor air pollution, making your candle experience healthier.
- Longer Candle Life: By trimming the wick, you prevent the excess buildup of carbon, which can shorten the lifespan of your candle. Regular maintenance extends the burning time, allowing you to enjoy your candles for longer.
Testing Candle Burn
To ensure an optimal burn and prevent sinkholes, we need to perform a candle test by trimming the wick and testing the candle.
Candle safety is of utmost importance, and conducting a burn test is a practical way to ensure that the candle is safe to use.
Start by trimming the wick to about a quarter of an inch before lighting it. This helps to control the flame and prevent excessive soot and smoke.

Then, light the candle and observe its fragrance and burn quality. A well-made candle should burn evenly, with a steady flame and a pleasant scent.
If you notice any issues like uneven burning or an unpleasant smell, it may be necessary to fix sinkhole issues.
Fixing Sinkhole Issues
To fix sinkhole issues with candles, we start by trimming the wick and testing the candle. Here are three steps to help troubleshoot your candle problems:
- Trim the wick: A long wick can lead to uneven burning and cause sinkholes. Use a wick trimmer or scissors to trim the wick to about 1/4 inch before lighting the candle. This will promote a steady and even burn.
- Test the candle: Before lighting the candle, check for any obstructions or debris in the wax. Remove any debris gently with a clean toothpick or a small spoon. Also, ensure that the candle is placed on a stable surface away from drafts or flammable objects.
- Burn the candle properly: To avoid sinkholes, allow the candle to burn until the wax melts evenly to the edges. This will prevent tunneling and ensure a clean, even burn throughout the candle’s lifespan.
Prevent Sinkholes in the Future
We consistently aim to prevent sinkholes in the future by implementing proactive measures.

To prevent future sinkholes, it’s important to troubleshoot sinking candles and address the underlying causes.
One common cause of sinkholes is improper wick trimming. Make sure to trim the wick to a quarter of an inch before lighting the candle.
Additionally, avoid placing candles in drafty areas or near air vents, as this can cause uneven burning and lead to sinkholes.
Using a candle snuffer instead of blowing out the flame can also help prevent sinkholes by minimizing the disturbance to the wax.

Lastly, allowing the candle to burn for a sufficient amount of time during each use will help prevent sinkholes by allowing the wax to melt evenly.
Frequently Asked Questions
How Long Do I Need to Melt the Wax Before Pouring It Into the Sinkhole?
To fix candle sinkholes, we need to melt the wax before pouring it in. The melting time may vary depending on the size of the sinkhole. However, there are alternative methods like using a heat gun for quicker results.
Can I Use a Hairdryer Instead of a Heat Gun to Even Out the Surface?
Sure, we can use a hairdryer instead of a heat gun to even out the surface. It may take a bit longer, but it’s a practical alternative. Just be careful not to hold it too close and melt the wax.
How Can I Prevent Sinkholes From Forming in My Candles?
To prevent sinkholes from forming in our candles, we prioritize candle maintenance. This includes trimming the wick to 1/4 inch before each use, avoiding drafts, and allowing the candle to burn long enough to create a full melt pool.

Is It Necessary to Trim the Wick Before Testing the Candle?
Yes, it’s essential to trim the wick before testing the candle. If not, it could lead to uneven burning and those dreaded sinkholes. So grab those scissors and give that wick a snip!
What Are Some Common Mistakes to Avoid When Fixing Candle Sinkholes?
Some common mistakes to avoid when fixing candle sinkholes include not properly melting the wax, using too much heat, and not allowing enough time for the wax to cool and solidify. Here are some tips for preventing sinkholes in candles.
Conclusion
In conclusion, by identifying the cause of sinkholes and using the right materials, you can easily fix candle sinkholes.
With the simple steps of melting and pouring wax, using a heat gun, and trimming the wick, your candle will look as good as new.

By taking these preventive measures, you can avoid sinkholes in the future and enjoy the beauty of your candles for longer periods of time.