To create DIY gel wax candles with embedded decorations, start by preparing your workspace with all supplies and safety measures. Melt the gel wax carefully, adding color and scent, then pour the first layer into your mold. Position decorations using tweezers before the wax cools, and repeat layering to embed more items. Allow each layer to set before adding the next. For detailed steps and tips on achieving a professional look, keep exploring—there’s more to discover!
Key Takeaways
- Select suitable decorations that are heat-resistant, flat or gently curved, and complement your candle’s aesthetic before embedding.
- Melt gel wax to approximately 180°F using a double boiler, then add dye and scent gradually for even coloring and fragrance.
- Pour a thin initial layer, allow it to cool slightly, then securely embed decorations with tools like tweezers before adding more gel.
- Keep the wick centered, pour slowly to prevent bubbles, and allow each layer to cool fully for a polished, professional look.
- Ensure safety by working in a ventilated area, using heat-resistant surfaces, monitoring wax temperature, and trimming wicks properly.

Gel Wax for Candle Making Clear Kit for Adults, DIY Transparent Jelly Wax Set with Electric Melter, Glass Jars, Wick, Dyes and Scents
Jelly Candle Making Kit:Includes 10.5oz of gel wax 4pcs, electric wax melting pot X1, glass candle jarX4, gift…
As an affiliate, we earn on qualifying purchases.
As an affiliate, we earn on qualifying purchases.
Gathering Supplies and Preparing Your Workspace

Before you begin making your gel wax candles, it’s important to gather all the necessary supplies and set up a clean, organized workspace. Proper workspace organization helps you work efficiently and reduces the risk of accidents. Always prioritize candle safety by keeping flammable materials away from open flames and working in a well-ventilated area. Gather your gel wax, wicks, molds, embedding decorations, melting pot, and tools beforehand so you’re prepared. Clear your surface of clutter and arrange your supplies within easy reach. Use heat-resistant surfaces and place a fire extinguisher nearby for safety. An organized, clean workspace not only streamlines your process but also minimizes hazards, ensuring your candle-making experience is enjoyable and safe from start to finish. Incorporating AI safety considerations into your workspace setup can help prevent potential issues and ensure a smoother crafting experience. Additionally, considering air quality by working in a well-ventilated area helps maintain a healthy environment during your project. Proper ventilation can also help disperse any fumes generated during melting and pouring, and being aware of candle safety guidelines is essential to prevent accidents.

7 Sets Flower Candle molds,3D Valentin e's Day Mold for Candle Making for Candle Soap Making,Handmade Cake Dessert Decoration Chocolate Cupcake Candy Ice Mold,Resin Concrete Art Crafts Accessories
EASY TO RELEASE:Simply pour your favorite ingredients in the mold,and keep the ingredients static until completely formed.This flexible…
As an affiliate, we earn on qualifying purchases.
As an affiliate, we earn on qualifying purchases.
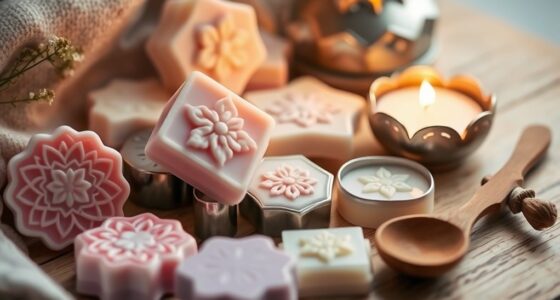
Choosing and Arranging Embedded Decorations

Selecting and arranging embedded decorations allows you to personalize your gel wax candles and create mesmerizing visual effects. First, choose decorations that complement your fragrance selection—think colorful stones, tiny figurines, or dried flowers. Position these items carefully, considering how they’ll look once the candle is lit. Incorporate elements of rustic decor to enhance the farmhouse aesthetic and add warmth to your candles. Here are three tips to get started: 1. Plan your layout before pouring to ensure decorations are evenly spaced. 2. Keep the wick placement in mind—place decorations away from the wick to prevent interference. 3. Use a clear adhesive or embed items during the initial pour to secure decorations firmly. Additionally, considering specialty materials like recycled or eco-friendly products can elevate your craft and support sustainable practices. Understanding candle safety is essential to ensure your decorated candles are safe to burn and enjoy. Exploring sound design techniques such as layering and manipulation can also inspire creative ways to incorporate visual effects into your candle displays.

CYS EXCEL Assorted Mix Colors Glass Gemstone Beads Vase Fillers (1 LB) Flat Marble Beads Multiple Color Choices Aquarium Decor Rocks Floral Stones Decorative Mosaic Gem Pebbles (Approx. 85-100 PCS)
Color-Size – 3/4 Inch Mix Colors | 1 LB/Bag Approx. 85~100 Pieces | Pack of 1 LB
As an affiliate, we earn on qualifying purchases.
As an affiliate, we earn on qualifying purchases.
Melting and Coloring the Gel Wax

Once you’ve arranged your embedded decorations, the next step is to melt the gel wax properly. Begin by using a double boiler or a heat-safe container in a simmering water bath, keeping the wax at a consistent wax temperature—around 180°F (82°C)—to prevent burning. As the wax melts, gently stir it to ensure even heating. When it’s fully melted, you can start color mixing. Add your gel wax dyes slowly, mixing thoroughly after each addition to achieve your desired hue. Keep in mind that gel wax colors tend to deepen as they cool, so aim for a slightly lighter shade. Maintain steady heat during the process, and avoid overheating, which can affect the clarity and texture of your wax. Additionally, understanding digital literacy can help you better research and select quality dyes and tools for your craft. Being aware of safety precautions is also essential to prevent accidents while working with hot wax and dyes. It’s important to monitor the temperature closely using a reliable thermometer, as improper heating can lead to issues like overheating or burning your wax, affecting the final appearance of your candles. Incorporating automation in business concepts can help streamline your candle-making process by setting timers or automated temperature controls.

37PCS Candle Making Tools Set Adjustable Punch Needle Long Silicone Mold Needle Drill Candle Wick Hole Drill Steel Sticks to Make Holes in Candles Soap,Mold Punch Wicking Needle Tools Inserting Tool
[Multifunctional & Rich Package]] – Our package contains 38 pieces,19pcs Hand Drill Adjustable Needle Punch Wicking Needle Tools…
As an affiliate, we earn on qualifying purchases.
As an affiliate, we earn on qualifying purchases.
Pouring the First Layer and Positioning Decorations

When pouring your first gel wax layer, use a steady hand and pour slowly to avoid creating air bubbles. Carefully position your decorations before the wax cools and hardens to make sure they stay in place. Keep in mind that gentle adjustments now will help your candle look polished and professional. Incorporating visualization techniques can also help ensure precise placement of your decorations. Additionally, understanding contrast ratio can guide you in selecting decorations that stand out effectively against the wax surface. Familiarity with Pimple Patch principles can guide you in selecting decorations that complement your style.
Pouring Technique Tips
To achieve a smooth and professional-looking candle, it’s important to pour the first layer carefully and with precision. Start by ensuring the wick is centered and secured, as proper wick placement affects both appearance and burning. When pouring, consider the candle fragrance; avoid overfilling to prevent overflow and uneven surfaces. Here are some tips to improve your pouring technique:
- Pour slowly and steadily, maintaining a consistent temperature to reduce bubbles and cracks.
- Use a pouring guide or level surface to keep the first layer even.
- Wait for the wax to cool slightly before adding decorations, ensuring the fragrance remains intact and decorations stay in place.
- Additionally, secure payment processing can help manage transactions smoothly if you decide to sell your candles online.
- For the best results, choose high-quality gel wax designed specifically for candle making, as this ensures clarity and durability.
- Proper wax temperature during pouring is essential to achieve a smooth surface and prevent imperfections.
Following these steps will help you create beautifully finished gel candles with embedded decorations.
Decoration Placement Strategies
For a polished look, carefully pour the first layer of gel wax, guaranteeing your wick is centered and secured. Proper decor placement is key to achieving appealing decoration aesthetics. As you add embedded decorations, think about their placement within the wax. Position larger or focal decorations closer to the center or slightly off-center for visual interest. Use tweezers or a skewer to adjust items before the wax cools. Keep in mind that the first layer should be thick enough to support your decorations but transparent enough to showcase them clearly. Avoid overcrowding; spacing your decorations thoughtfully enhances the overall appearance. Proper decoration placement ensures your embedded elements stand out and the finished candle looks professional and visually balanced. Understanding aesthetic principles can help guide your placement choices for a more harmonious design. Additionally, considering regional trends in decoration styles can influence your choices to match current popular aesthetics. Being aware of visual balance is crucial for creating an appealing and cohesive look in your candle design. Incorporating material compatibility considerations will also ensure your embedded decorations adhere well and withstand the cooling process.
Creating Multiple Layers With Embedded Items

To add depth to your gel candle, you can create multiple layers that showcase embedded items. Use careful layering techniques to prevent colors and objects from mixing or floating unexpectedly. With the right approach, your candles will have a professional look and striking visual interest.
Layering Techniques for Depth
Creating multiple layers with embedded items adds visual interest and depth to your gel wax candles. To achieve this, consider these key steps:
- Plan your layers by choosing different embedded decorations and varying the height of each layer for a dynamic look.
- Pour in stages, allowing each layer to cool slightly but stay pourable, ensuring embedded items stay in place.
- Select the right wick and add your preferred candle scent at each stage for consistent aroma and proper burning.
- Incorporate proper maintenance techniques to keep your candles in excellent condition and ensure long-lasting beauty. Proper layering also requires attention to temperature control to prevent cracking or uneven surfaces.
- Using quality gel wax can improve the overall appearance and durability of your layered candles. Layering not only enhances the visual appeal but also emphasizes the embedded decorations. Keep in mind that the wick must be suitable for gel wax and your scent choice to ensure a clean, even burn. Proper layering creates a sense of depth that makes your candle a fascinating centerpiece.
Embedding Items Effectively
Embedding items in gel wax candles requires careful placement and timing to guarantee they stay in position and look appealing. To achieve this, select decorations that are flat or gently curved to prevent shifting. During pouring, allow the gel to cool slightly before adding each item, which helps embed them securely without floating to the surface. Always prioritize embedding safety by choosing heat-resistant decorations and avoiding sharp or fragile objects that could crack or pose safety risks. When creating multiple layers, pour a small amount of gel first, let it set partially, then place your decoration, and add more gel to cover it. This layered approach creates depth and keeps your embedded items stable. Proper decoration selection and timing ensure your design looks professional and remains safe.
Allowing the Candle to Set and Finishing Touches

Once you’ve poured the wax into your container, it’s important to let the candle sit undisturbed until it’s fully set. This guarantees a smooth, professional finish. While waiting, consider these finishing touches:
- Trim the wick to about ¼ inch for ideal burning and safety. Proper wick selection helps distribute the candle fragrance evenly.
- Add candle fragrance if you haven’t already, ensuring it’s well mixed before pouring for a consistent scent.
- Smooth the surface with a heat gun or a quick reheat to remove any imperfections and create a polished look.
Allowing the candle to set completely guarantees a better burn and scent throw, making your embedded decorations stand out beautifully.
Tips for Safe and Successful Candle Making

To guarantee a safe and successful candle-making experience, always prioritize proper preparation and adherence to safety guidelines. Choose a high-quality candle fragrance to avoid uneven burning or poor scent throw. When selecting your wick, consider size and material to ensure even melting and minimal soot. Keep a thermometer handy to monitor wax temperature, preventing overheating. Work in a well-ventilated area and never leave melting wax unattended. Using the right tools minimizes spills and accidents. Here’s a quick guide to keep in mind:
| Tip | Why it’s important | Example |
|---|---|---|
| Candle fragrance | Adds scent and enhances ambiance | Use a moderate amount |
| Wick selection | Ensures proper burn and safety | Cotton or wood wicks |
| Temperature control | Prevents wax damage and hazards | Keep below 200°F |
| Ventilation | Reduces inhalation of fumes | Open windows during work |
Frequently Asked Questions
How Long Does It Typically Take for the Gel Wax to Fully Cure?
You should expect gel wax to fully cure in about 24 to 48 hours. Proper curing time depends on temperature control; keep your candles in a cool, stable environment to prevent cracks or imperfections. Avoid moving or handling the candles during this period to guarantee the embedded decorations set correctly. Patience is key—allowing adequate curing time will give you a smooth, professional-looking finish with your embedded decorations intact.
Can I Reuse Leftover Gel Wax From Previous Candles?
You can reuse leftover gel wax from previous candles, so don’t throw it away—wax recycling is a smart choice. While some might worry about contamination or scent transfer, properly melting and filtering the wax can make it safe and effective for new candles. Reusing wax helps reduce waste, saves money, and lets you get creative with embedded decorations. Just verify the wax is clean and free of debris before pouring your new creation.
What Are Some Eco-Friendly Alternatives to Traditional Candle Dyes?
You can use plant-based dyes or natural colorants as eco-friendly alternatives to traditional candle dyes. These options come from sources like herbs, spices, fruits, and vegetables, which are biodegradable and non-toxic. When you choose natural colorants, you reduce chemical waste and make your candle-making more sustainable. Simply add these plant-based dyes during the melting process, and enjoy beautifully colored, eco-conscious candles that are safer for you and the environment.
How Do I Prevent Bubbles From Forming in the Gel Wax?
Bubbles in gel wax are as annoying as a fly in your soup! To prevent them, pour the wax slowly to minimize air bubbles and keep the surface tension balanced. Gently tap the container or use a toothpick to pop any bubbles that form before the wax cools. Also, make sure your wax is at the right temperature—too hot or cold, and bubbles are more likely to appear.
What Should I Do if My Embedded Decorations Sink or Float?
If your embedded decorations sink or float, adjust the embedding placement for better stability. Position decorations closer to the center of the candle to prevent sinking, or keep them near the surface to avoid floating. Use a small amount of melted gel wax to secure decorations firmly in place, ensuring they stay stable throughout the process. This helps maintain the intended placement and creates a polished, professional look.
Conclusion
Now that you know how to create stunning gel wax candles with embedded decorations, you’re ready to craft personalized pieces that brighten any space. Did you know that candle making has grown into a $3 billion industry worldwide? With a little creativity and safety precautions, you can turn this popular hobby into unique gifts or home decor. So, gather your supplies and start experimenting—your beautiful, custom candles are just a pour away!